This simple tutorial shows to add ‘Open in Terminal’ similar context menu option to open non-default terminal emulator in Ubuntu, Fedora Workstation with default GNOME Desktop.
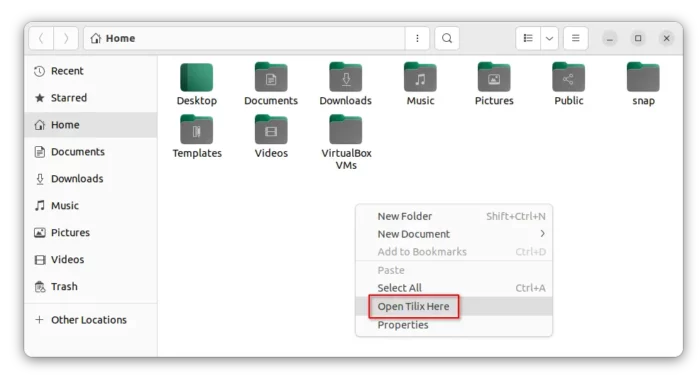
When you right-clicking on blank area or a folder in GNOME Files (aka Nautilus), there’s an option “Open in Terminal” (or “Open in Console”) to quickly open the default terminal emulator with current folder as working directory.
For those who prefer another terminal emulator to the default one, it’s possible to make ‘Open in Terminal’ similar option for your favorite terminal with a free open-source tool called ‘Nautilus Open any Terminal’.
With the tool, you may add context menu option to quickly open following terminal emulators:
- alacritty
- blackbox
- cool-retro-term
- deepin-terminal
- foot/footclient
- guake
- hyper
- kermit
- kgx (GNOME Console), though
nautilus-extension-gnome-consolecan do the same job. - kitty
- konsole
- mate-terminal
- mlterm
- qterminal
- sakura
- st, properly patched
- tabby
- terminator
- terminology
- termite
- tilix
- urxvt
- urxvtc
- wezterm
- xfce4-terminal
Step 1: Install nautilus-open-any-terminal
For Arch Linux user, simply open a terminal window and run command to install the tool from AUR repository:
yay -S nautilus-open-any-terminal
And NixOS can install the tool via command:
nix-env -iA nixos.nautilus-open-any-terminal
For Ubuntu, Debian, Fedora and their based systems, first install the Python package installer via command:
sudo apt install python3-pip python3-nautilus
Replace apt with dnf in command for Fedora based systems.

Then, use the pip command to install the tool:
pip install --user nautilus-open-any-terminal

Step 2: Set your Terminal Emulator integration with Nautilus
After installed the tool via the first step, do following one by one to integrate your terminal with Nautilus file manager.
1. First, use command below to reload extension for file manager:
nautilus -q
2. Next, run command to generate gsettings configuration settings:
glib-compile-schemas ~/.local/share/glib-2.0/schemas/
In case you installed it system wide, also run glib-compile-schemas /usr/share/glib-2.0/schemas.
3. Finally, set your terminal emulator (tilix for example) used in Nautilus for open here extension:
gsettings set com.github.stunkymonkey.nautilus-open-any-terminal terminal tilix
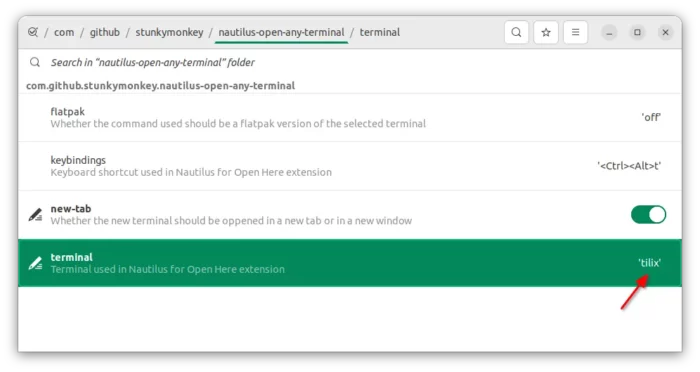
You may also install and use Dconf Editor from Ubuntu Software/Gnome Software. And, set you terminal emulator by going to “com.github.stunkymonkey.nautilus-open-any-terminal terminal” settings page in Dconf Editor:
After all, right-click on a folder or blank area in file manager to see the magic!
That’s all. Enjoy!
How to Undo the changes
You may change the terminal used in Nautilus at any time by either running gsettings command or using Dconf Editor.
To remove the context menu option, either manually remove the associated files by running commands below one by one:
rm ~/.local/share/nautilus-python/extensions/open_any_terminal_extension.py
rm ~/.local/share/glib-2.0/schemas/com.github.stunkymonkey.nautilus-open-any-terminal.gschema.xml
glib-compile-schemas ~/.local/share/glib-2.0/schemas/
In case you installed the extension files into system wide directory, remove them via:
sudo rm /usr/share/nautilus-python/extensions/open_any_terminal_extension.py
sudo rm /usr/share/glib-2.0/schemas/com.github.stunkymonkey.nautilus-open-any-terminal.gschema.xml
glib-compile-schemas /usr/share/glib-2.0/schemas
Or use the script from the source project page.
To remove the nautilus-open-any-terminal tool, use command:
pip uninstall nautilus-open-any-terminal
And finally, reload Nautilus file manager via nautilus -q command.








Recent Comments