


For Java developers and those who want to run Java applications, here’s how to install and setup the latest Oracle Java 20 in Debian 12 Bookworm.
Like other Linux Distributions, Debian includes the open-source Java platform ‘OpenJDK‘ in its main repositories. Users may install it simply by running sudo apt install default-jdk command in terminal.
However, due to license issue Oracle Java is excluded from Linux repository. Users have to install it manually from Oracle website. And here’s step by step how to trick to do the job!
Though title said for Debian, this tutorial also works in Ubuntu 22.04, 23.04, 23.10!
Step 1: Download the Latest Java package
Oracle Java provides the latest Linux packages for downloading at its website. You can visit the link below to select download the package:
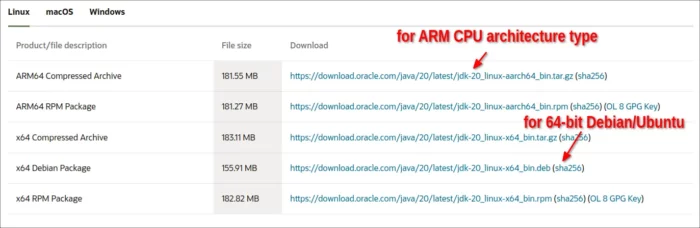
In the download page, select download one of packages below:
- ARM64 Compressed Archive – for 64-bit ARM CPU architecture type, such as Raspberry Pi and Apple M1/M2.
- x64 Debian Package – for Debian/Ubuntu running on modern 64-bit x86 PC and laptop.
Step 2: Install the Java package
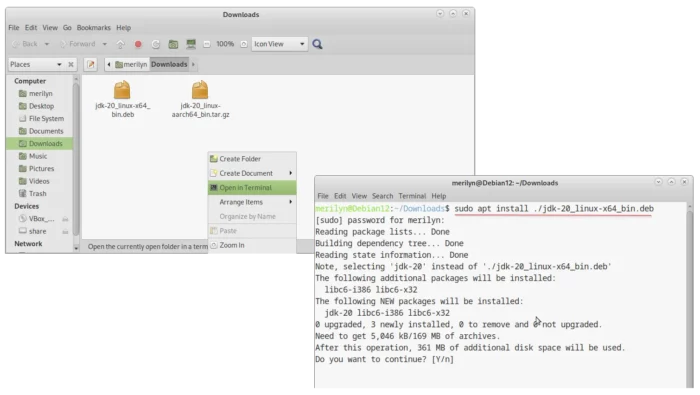
After downloaded the Java package, open to your Downloads folder. Right-click on blank area and select “Open in Terminal“. So it opens a terminal window with your Downloads as working directory.
Then, install the Java package accordingly.
- For the ‘x64 Debian Package’, just run command to install it:
sudo apt install ./jdk-*_linux-x64_bin.deb
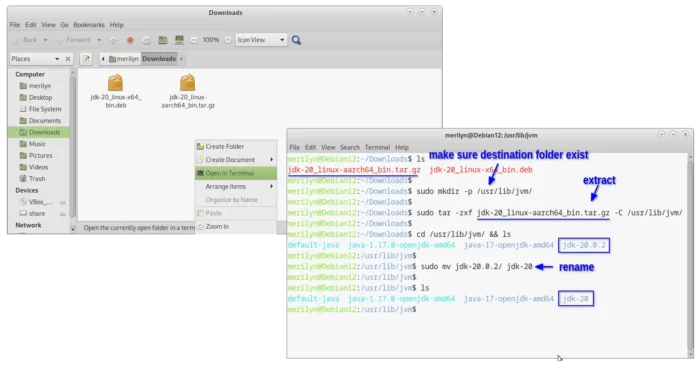
- For the ‘ARM64 Compressed Archive’, run commands below one by one to extract it to ‘/usr/lib/jvm’:
- First, make sure the destination directory exist, by trying to create it:
sudo mkdir -p /usr/lib/jvm
- Then, run command to extract the archive to that directory:
sudo tar -zxf jdk-*_linux-aarch64_bin.tar.gz -C /usr/lib/jvm
- Verify the extracted folder:
cd /usr/lib/jvm && ls
- Rename the extracted folder, for easy later use:
sudo mv jdk-20.* jdk-20
- First, make sure the destination directory exist, by trying to create it:
Step 3: Set Java 20 as Default
Now, you can set the Oracle Java 20 you just installed as default by doing following steps one by one.
Also, open terminal and run commands below one by one:
- First, use
update-alternativescommands to install Java 20 as alternative links to java executables:sudo update-alternatives --install /usr/bin/java java /usr/lib/jvm/jdk-20/bin/java 100
sudo update-alternatives --install /usr/bin/javac javac /usr/lib/jvm/jdk-20/bin/javac 100
For choices, you may also run similar command to install
jaretc as alternative.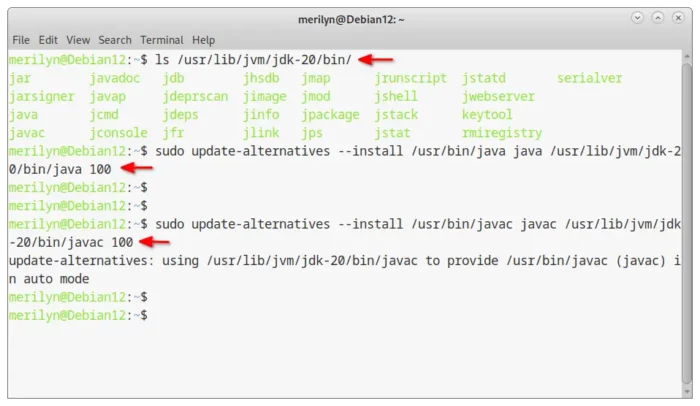
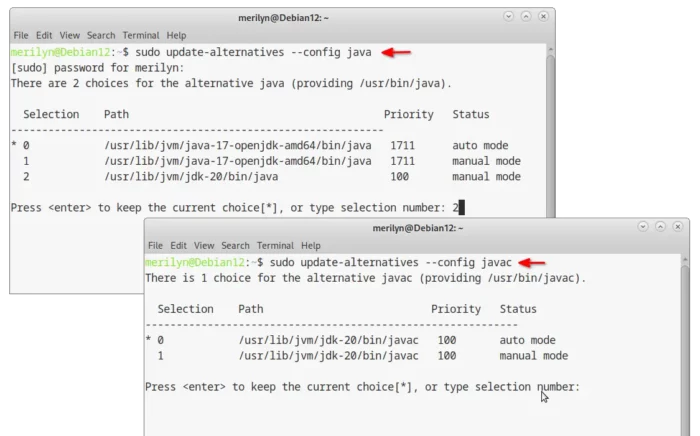
- Then, run
update-alternativescommand with--configflag to set the default Java executable one by one:sudo update-alternatives --config java
sudo update-alternatives --config javac
In terminal output, type your desired number and hit Enter to choose which Java as default
When done, verify by running java --version and javac --version in terminal.
Step 4: Set Java HOME & PATH variables
For temporary use, you can run a single command in terminal to set Java Home. However, it works in that terminal window only until you close it.
export JAVA_HOME=/usr/lib/jvm/jdk-20
To make it system wide and permanently, you need to add the rules into profile config file.
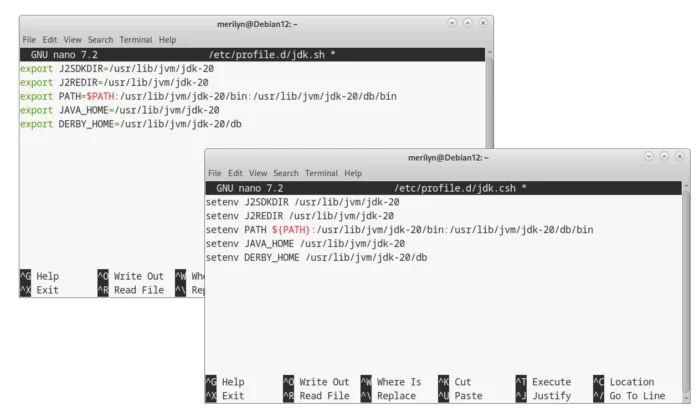
- First, open terminal and run command to create & edit a system-wide profile file:
sudo nano /etc/profile.d/jdk.sh
When file opens in terminal, paste following lines:
export J2SDKDIR=/usr/lib/jvm/jdk-20
export J2REDIR=/usr/lib/jvm/jdk-20
export PATH=$PATH:/usr/lib/jvm/jdk-20/bin:/usr/lib/jvm/jdk-20/db/bin
export JAVA_HOME=/usr/lib/jvm/jdk-20
export DERBY_HOME=/usr/lib/jvm/jdk-20/db
Finally, press Ctrl+X, type y and hit Enter to save the file.
- Then, run command & edit another profile config file:
sudo nano /etc/profile.d/jdk.csh
And, paste following lines:
setenv J2SDKDIR /usr/lib/jvm/jdk-20
setenv J2REDIR /usr/lib/jvm/jdk-20
setenv PATH ${PATH}:/usr/lib/jvm/jdk-20/bin:/usr/lib/jvm/jdk-20/db/bin
setenv JAVA_HOME /usr/lib/jvm/jdk-20
setenv DERBY_HOME /usr/lib/jvm/jdk-20/db
Finally, press Ctrl+X, type y and hit Enter to save the file.
When done, restart your computer and verify Java HOME by running java -XshowSettings:properties -version command.
Uninstall
To uninstall Java 20 installed via the previous steps, open terminal and run commands below one by one.
For the Java package installed via .deb package, run command to remove it:
sudo apt remove jdk-20
For the Arm64 package, just remove the Java folder under ‘/usr/lib/jvm’ directory:
sudo rm -R /usr/lib/jvm/jdk-20
Also, remove the config file under ‘/etc/profile.d’ directory:
sudo rm /etc/profile.d/jdk.sh /etc/profile.d/jdk.csh