


Oracle announced the GA of Java JDK 22 a few days ago. Here’s how to install and set it up in Debian Stable Bookworm.
Java JDK 22 has 6 months support, until September 2024. Features in the release include:
- JEP 423 – Regional Pinning for G1
- JEP 447 – Statements before super (…) [Preview]
- JEP 454 – Foreign Function & Memory API
- JEP 456 – Unnamed Variables & Patterns
- JEP 457 – Class-File API (Preview)
- JEP 458 – Launch Multi-File Source-Code Programs
- JEP 459- String Templates (Second Preview)
- JEP 460 – Vector API (7th Incubator)
- JEP 461 – Stream Gatherers (Preview)
- JEP 462 – Structured Concurrency (2nd Preview)
- JEP 463 – Implicitly Declared Classes and Instance Main Methods (Second Preview)
- JEP 464 – Scoped Values (2nd Preview)
Step 1: Download the Latest Java package
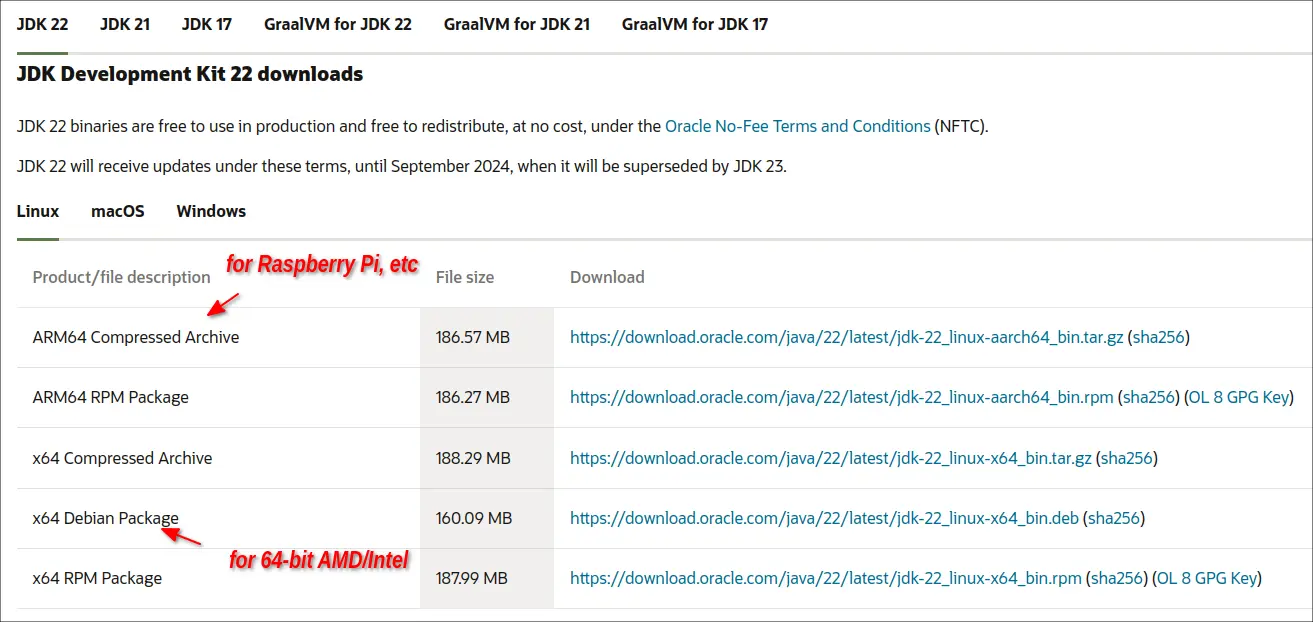
Oracle provides official Linux packages, available to download via the link button below:
In the download page, select download one of the packages depends on your system type:
- ARM64 Compressed Archive – for 64-bit ARM CPU architecture type, such as Raspberry Pi and Apple M1/M2.
- x64 Debian Package – for Debian/Ubuntu running on modern 64-bit x86 Intel/AMD PC and laptop.
Don’t know your system type? Launch terminal and run uname -m command to tell. And, amd64 means for x86_64 or x64, arm64 or AArch64 means 64-bit ARM.
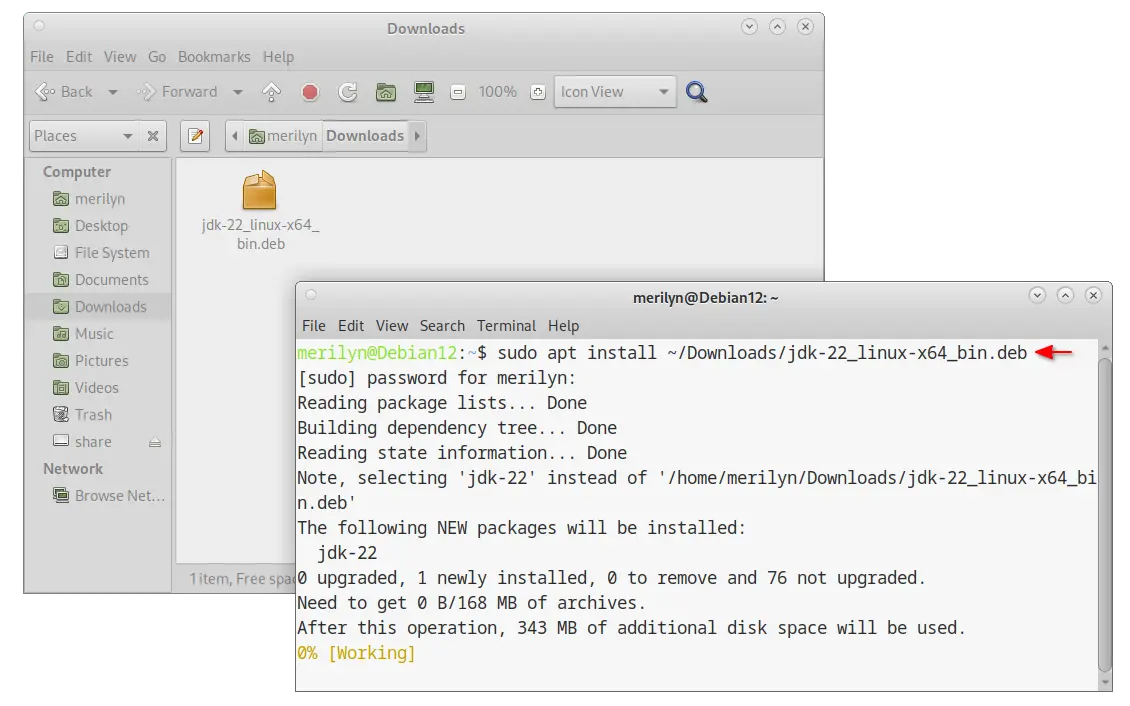
Step 2: Install the Java package
After downloaded the Java package, open terminal and run either commands below to install it.
For x64 Debian Package, simply run the apt install command in terminal to install the downloaded .deb package:
sudo apt install ~/Downloads/jdk-*_linux-x64_bin.deb
Instead of manually typing PATH to the .deb package (~/Downloads/jdk-*_linux-x64_bin.deb), you may drag and drop the file into terminal to do the trick.
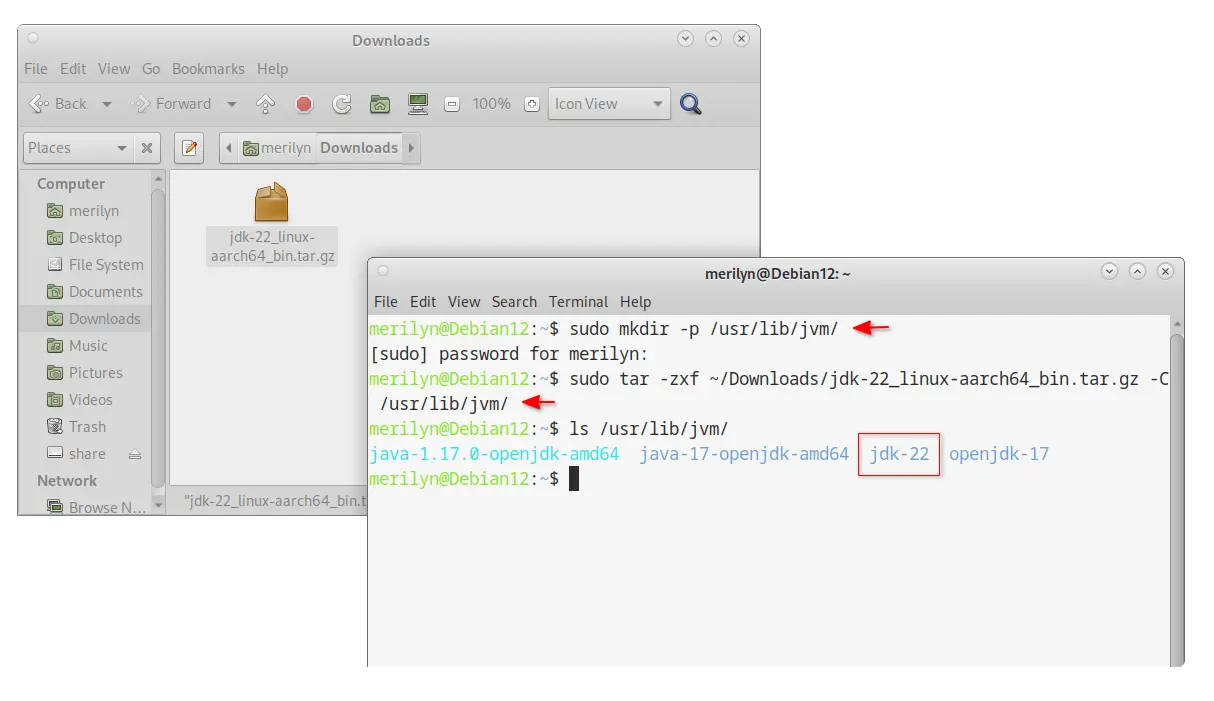
For the ‘ARM64 Compressed Archive’, run commands below one by one to extract it to ‘/usr/lib/jvm’:
-
- First, make sure the destination directory exist, by trying to create it:
sudo mkdir -p /usr/lib/jvm
- Then, run command to extract the tarball to that directory (here assume you saved the tarball in user Downloads folder):
sudo tar -zxf jdk-*_linux-aarch64_bin.tar.gz -C /usr/lib/jvm
- Verify by running command:
ls /usr/lib/jvm
- First, make sure the destination directory exist, by trying to create it:
Step 3: Set Java 22 as Default (for ARM only)
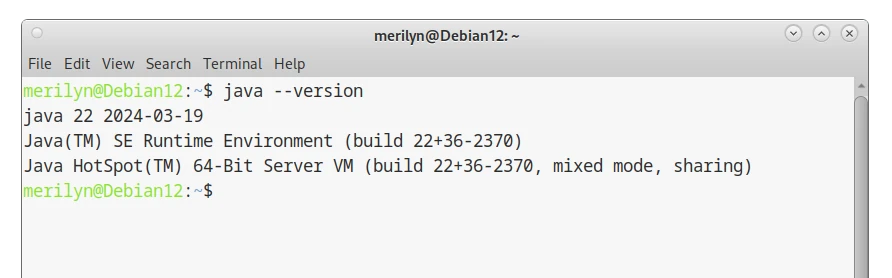
Installing the X64 .deb package now automatically set the Java installation as default for your machine! Just verify by running java --version command.
For choice, you may run ‘update-alternatives --config‘ command (see it below) to set another Java (if installed) as default.
For ARM version, open terminal and run commands below one by one to set the default Java:
- First, use
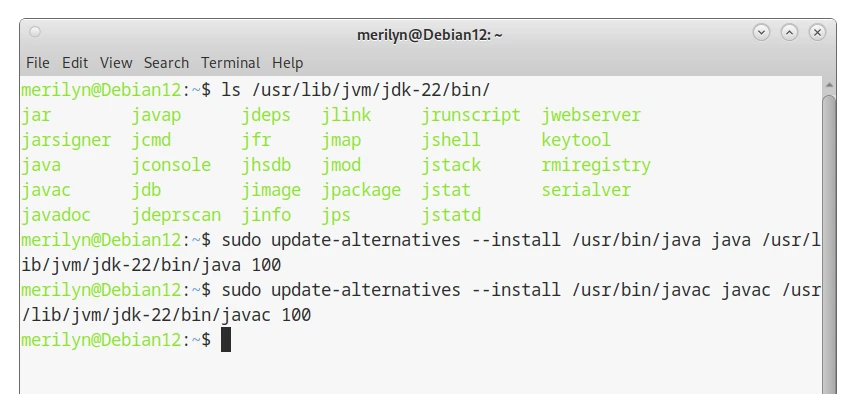
update-alternativescommand to install Java 22 as alternative links to java executable:sudo update-alternatives --install /usr/bin/java java /usr/lib/jvm/jdk-22/bin/java 100
sudo update-alternatives --install /usr/bin/javac javac /usr/lib/jvm/jdk-22/bin/javac 100
For choices, you may also run similar command to install
jaretc as alternative.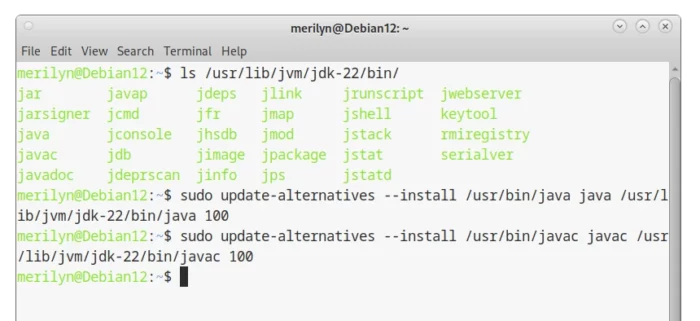
- Then, run
update-alternativescommand with--configflag to set the default Java executable one by one:sudo update-alternatives --config java
sudo update-alternatives --config javac
In terminal output, type your desired number and hit Enter to choose which Java as default
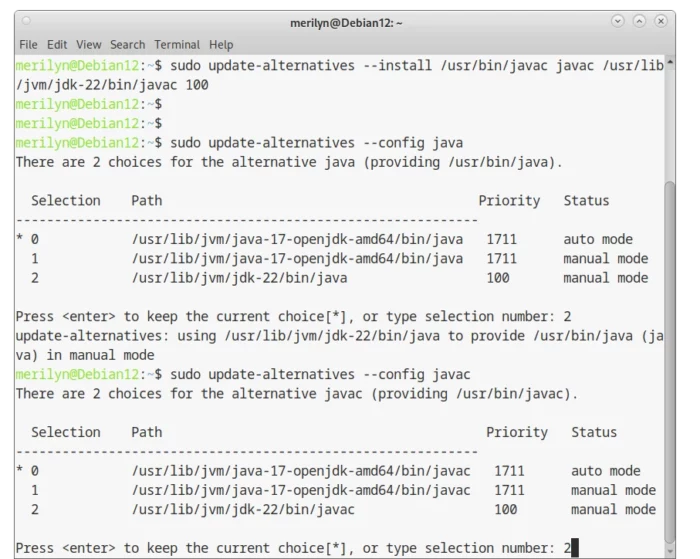

When done, verify by running java --version and javac --version in terminal.
Step 4: Set Java HOME & PATH variables
NOTE: The x64 .deb package installs JDK 22 to /usr/lib/jvm/jdk-22-oracle-x64. So If you’re going to try the following steps in x64 (Intel/AMD) platform, replace all “jdk-22” with “jdk-22-oracle-x64” in following codes.
For temporary use, you can run a single command in terminal to set Java Home. However, it works in that terminal window only until you close it.
export JAVA_HOME=/usr/lib/jvm/jdk-22
To make it system wide and permanent, you need to add the rules into profile config file.
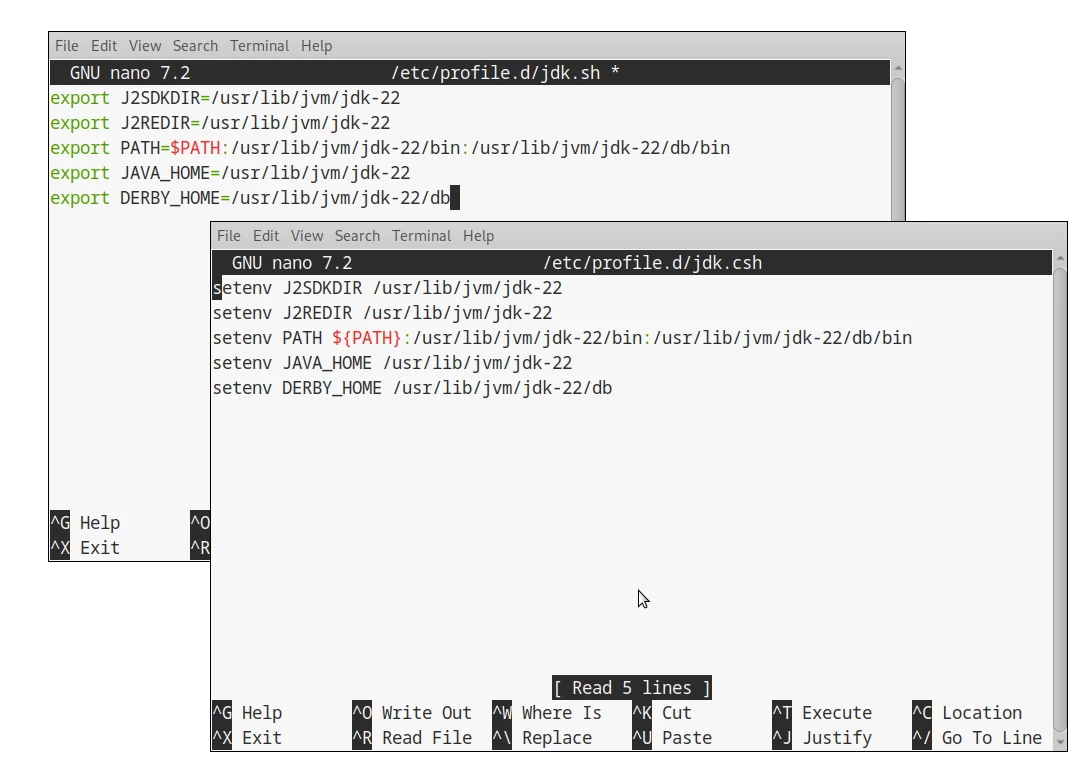
- First, open terminal and run command to create & edit a system-wide profile file:
sudo nano /etc/profile.d/jdk.sh
When file opens in terminal, paste following lines:
export J2SDKDIR=/usr/lib/jvm/jdk-22
export J2REDIR=/usr/lib/jvm/jdk-22
export PATH=$PATH:/usr/lib/jvm/jdk-22/bin:/usr/lib/jvm/jdk-22/db/bin
export JAVA_HOME=/usr/lib/jvm/jdk-22
export DERBY_HOME=/usr/lib/jvm/jdk-22/db
Finally, press Ctrl+S to save, then Ctrl+X to exit nano text editor.
- Then, run command & edit another profile config file:
sudo nano /etc/profile.d/jdk.csh
And, paste following lines:
setenv J2SDKDIR /usr/lib/jvm/jdk-22
setenv J2REDIR /usr/lib/jvm/jdk-22
setenv PATH ${PATH}:/usr/lib/jvm/jdk-22/bin:/usr/lib/jvm/jdk-22/db/bin
setenv JAVA_HOME /usr/lib/jvm/jdk-22
setenv DERBY_HOME /usr/lib/jvm/jdk-22/db
Finally, press Ctrl+X, type y and hit Enter to save the file.
When done, restart your computer and verify Java HOME by running java -XshowSettings:properties -version command.
Uninstall
To uninstall Java 22 installed via the previous steps, open terminal and run commands below one by one.
For the Java package installed via .deb package, run command to remove it:
sudo apt remove jdk-22
For the Arm64 package, just remove the Java folder under ‘/usr/lib/jvm’ directory:
sudo rm -R /usr/lib/jvm/jdk-22
Also, remove the config file under ‘/etc/profile.d’ directory:
sudo rm /etc/profile.d/jdk.sh /etc/profile.d/jdk.csh