For Linux users, managing file permission and ownership is one of the must-have skills. And here I’m going to show you how to tell and edit file permissions as well as ownership in details.
How to see file permissions and ownership in Linux:
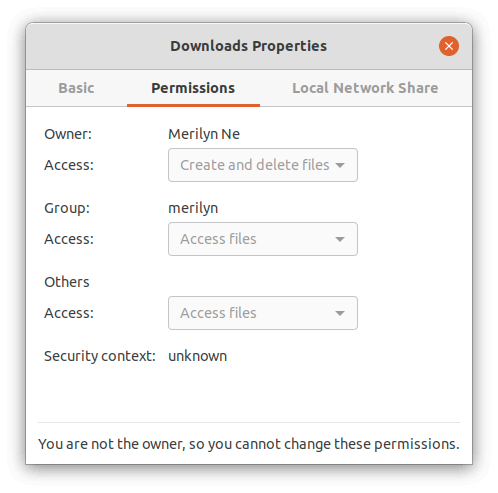
If you’re working on Linux with a desktop environments, thing will be quite easy. Simply right on the file or folder and go to ‘Properties’.
It shows the owner, group, as well as permissions in “Permissions” tab. As well, you can change them if you’re the owner.
However, you are mostly here for Linux Server, e.g., Ubuntu, Debian, CentOS. So I’ll tell and explain the commands below.
1. Command to list file permission / ownership.
We usually use ls command to list information about the file or directory.
To list current directory content, run:
ls -al
To list a specified file or folder, user’s Downloads folder for instance, run:
ls -al ~/Downloads
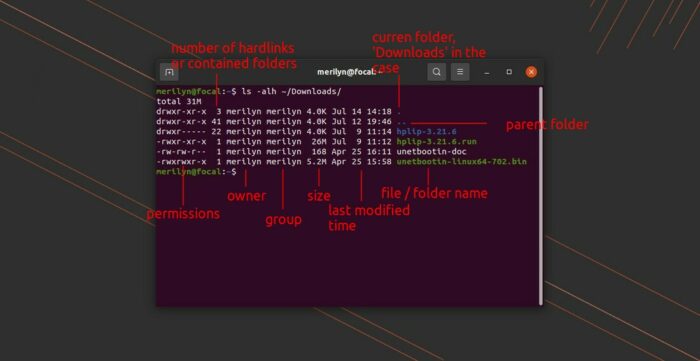
It will output something like the picture shows:
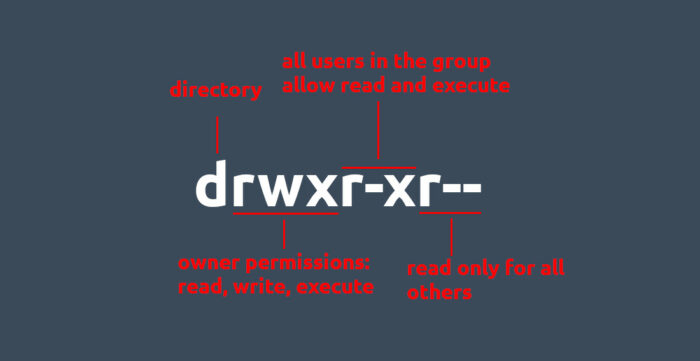
As you can see, the first column shows the permissions:
- ‘d‘ means directory. ‘.‘ is the current, and ‘..‘ means parent folder.
- ‘r‘, ‘w‘, and ‘x‘ stands for read, write, and executable permissions.
- And ‘–‘ is there for either non-directory or no read, write, or execute permission.
The first letter ‘d‘ or ‘–‘ tells either folder or not. The 2 ~ 4 letters indicates permissions for the owner. And the 5 ~ 7 letters shows for all users in the group. The last three tells permissions for everyone else.
The second column in ls -al command output indicates number of hard-links for file, or number of contained folders, including itself and the parent (‘.‘ and ‘..‘).
While the third and forth columns display the owner and group names, the last three shows the file size, last modified time, as well as filename.
Change file permission and ownership in Linux
1. chown – change the ownership.
Change the owner and group is easy via chown command.
For example, change the owner of a file in current directory to user ‘merilyn’ run command:
sudo chown merilyn filename
Change the group to ‘root’, use:
sudo chown :root filename
And set the owner to ‘merilyn’, group to ‘root’ run:
sudo chown merilyn:root filename
For a folder directory, you can add -hR flag to change ownership for itself and all contained files/folders. For instance, the command will set the “Documents” and all in that folder to group ‘root’.
sudo chown :root -hR ~/Documents
2. chmod – change file permissions.
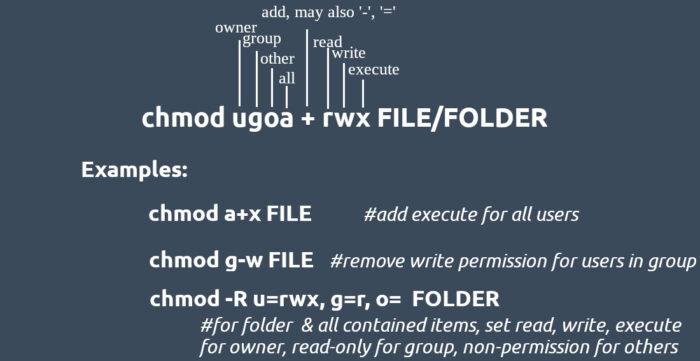
chmod command allows to change file or folder permissions for owner, group, and all others.
chmod ugoa + rwx FILE_OR_FOLDER
- ‘u‘ = user (the owner), ‘g‘ = group, ‘o‘ = others, ‘a‘ = all. You can use either one or a combination
- ‘+‘ means add permission. It can also be ‘–‘ to remove permission, or ‘=‘ to set permission.
- ‘r‘, ‘w‘, ‘x‘ stands for read, write, execute. Use either of them or combination.
Here are some examples:
- Add read permission to ~/Downloads and subfiles for all users:
chmod -R a+r ~/Downloads
- Remove execute permission of file for others:
chmod o-x FILE
- set read, write, execute for owner, read and write for group users, and read-only for others:
chmod u=rwx,g=rw,o=r FILE
- add execute permission for all users, without specify
ugoaon command. NOT work when add/removewfor others.chmod +x FILE
NOTE: for file or folder NOT belong to the current user, you HAVE to add sudo at the beginning for each command. For instance:

sudo chmod o-r /etc/apt/sources.list
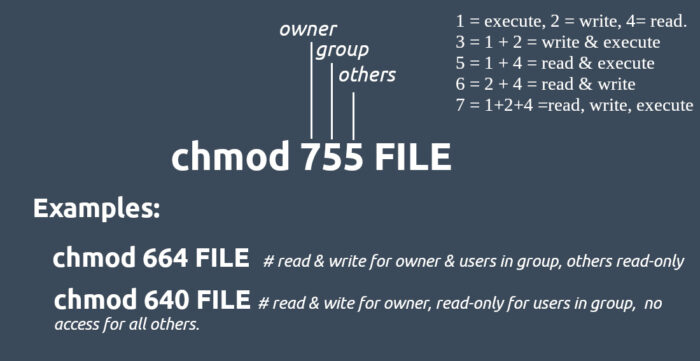
To make life easier, a numeric mode is available.
- 4 is equivalent to ‘r‘ (read).
- 2 = ‘w‘ (write).
- 1 = ‘x‘ (execute).
- And 7 = 1 + 2 + 4, means read, write, and execute.
- 6 stands for read and write
- 5 = 1 + 4 means read and execute.
So you can use 3 numbers from possible combinations, to set permission for owner, group, others via single command. For example, the command below set read, write & execute to owner, read & execute for group and all other users:
chmod 755 FILE
That’s all. Enjoy!








Recent Comments