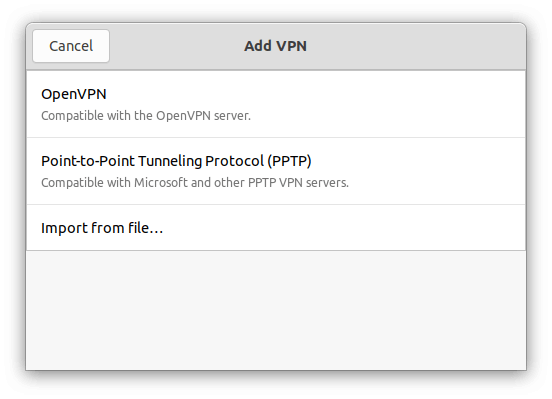
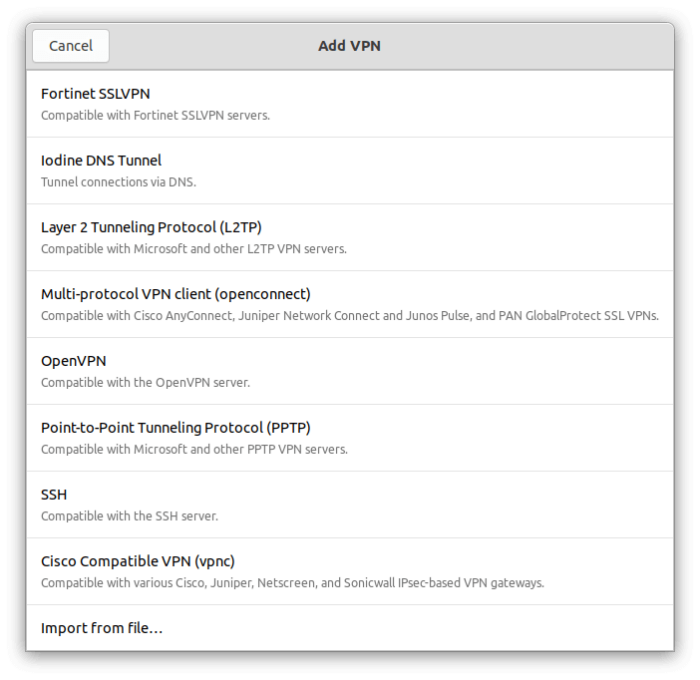
Got a VPN Server? You may found that Ubuntu only supports for connecting to PPTP and OpenVPN by default. What if your remote server was setup with “L2TP”, “Cisco VPN”, “Fortinet SSL”, or “SSH VPN”? Well, here’s how to enable these virtual private network support via default network manager in GNOME.

Add more VPN Support in GNOME:
GNOME’s default network manager has those VPN type support via plugins. However, they are usually NOT enabled by default. If you have a VPN that’s not in the list of network settings, choose one of the commands below to enable it.
Enable L2TP Support
First, press Windows/Super key on keyboard to bring up overview screen. When it opens, search for and open “terminal”.
When terminal opens, run command to install Layer 2 Tunneling Protocol (L2TP) support for GNOME network manager:
sudo apt install network-manager-l2tp-gnome
Type user password when it asks, though no visual feedback. And type y to confirm installing the package.
merilyn@focal:~$ sudo apt install network-manager-l2tp-gnome
[sudo] password for ji:
Reading package lists... Done
Building dependency tree... Done
Reading state information... Done
The following additional packages will be installed:
  libcharon-extauth-plugins libstrongswan libstrongswan-standard-plugins
  network-manager-l2tp strongswan strongswan-charon strongswan-libcharon
  strongswan-starter xl2tpd
Suggested packages:
  libstrongswan-extra-plugins libcharon-extra-plugins
The following NEW packages will be installed:
  libcharon-extauth-plugins libstrongswan libstrongswan-standard-plugins
  network-manager-l2tp network-manager-l2tp-gnome strongswan strongswan-charon
  strongswan-libcharon strongswan-starter xl2tpd
0 upgraded, 10 newly installed, 0 to remove and 85 not upgraded.
Need to get 1,183 kB of archives.
After this operation, 5,348 kB of additional disk space will be used.
Do you want to continue? [Y/n]
Enable VPNC Support:
To enable VPN client support for the Cisco 3000 VPN Concentrator, run command to install another package in terminal:
sudo apt install network-manager-vpnc-gnome
For Fortinet SSLVPN, OpenConnect, iodine, SSH VPN :
There are a few other plugins for more VPN protocol support, choose the one that you need or use the last command to install them all.
Install Fortinet SSLVPN plugin via command:
sudo apt install network-manager-fortisslvpn-gnome
Enable OpenConnect support via command:
sudo apt install network-manager-openconnect-gnome
For SSH VPN, run command:
sudo apt install network-manager-ssh-gnome
And run command to iodine plugin:
sudo apt install network-manager-iodine-gnome
To get them all, you may run this single command instead of typing each package name one by one:
sudo apt install network-manager-*-gnome
Connect to your VPN Server:
After installing the plugin that you need, open “Settings” and go to “Network” pane. There click on ‘+‘ icon to add a VPN network.

Choose your VPN type from the list and set up server IP, authentication, etc, and enjoy!


Recent Comments