

I’ve written about how to install the latest Oracle Java JDK in Ubuntu. Here I’m going to rewrite the tutorial to cover more Linux systems.
Oracle offers official binary packages for downloading in its website. User has just to install the files into right location and setup the environment variables. And here’s how to do the job step by step.
Step 1: Download & Install Java package
First, go to the official download page by visiting the link below:
Then select download one of the packages below for your system:
- x64 Debian Package – for modern 64-bit Debian, Ubuntu, Linux Mint, Pop! OS, Zorin OS, Kali Linux, etc.
- x64 RPM Package – for 64-bit Fedora, REHL, Rocky Linux, CentOS, openSUSE, etc.
- x64 Compressed Archive – for Arch, Manjaro and other Linux.
- Arm 64 RPM Package – for Fedora, REHL, etc on Apple Silicon, Raspberry Pi etc devices.
- Arm 64 Compressed Archive – universal package for Linux on Arm devices.
Install the Debian (.deb) package
After downloading the .deb package in Debian/Ubuntu based systems, either double-click on it in file manager to open with your system Software App and click install.
Or open terminal and install the package via apt command:
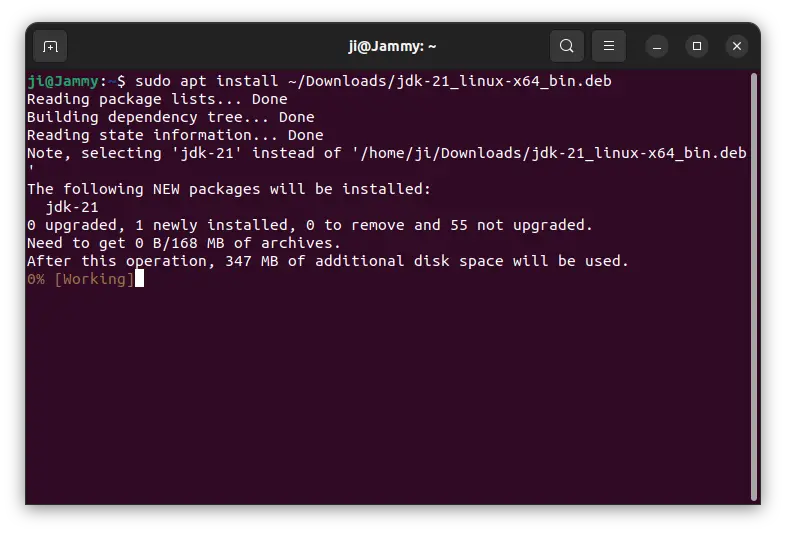
sudo apt install ~/Downloads/jdk-*_linux-x64_bin.deb
Here assume you saved the package in user’s ‘Downloads’ folder. When done, just go bottom step to verify.
Install the RPM package
Also, in today’s Linux, you may double-click on the RPM package to install via system’s Software App.
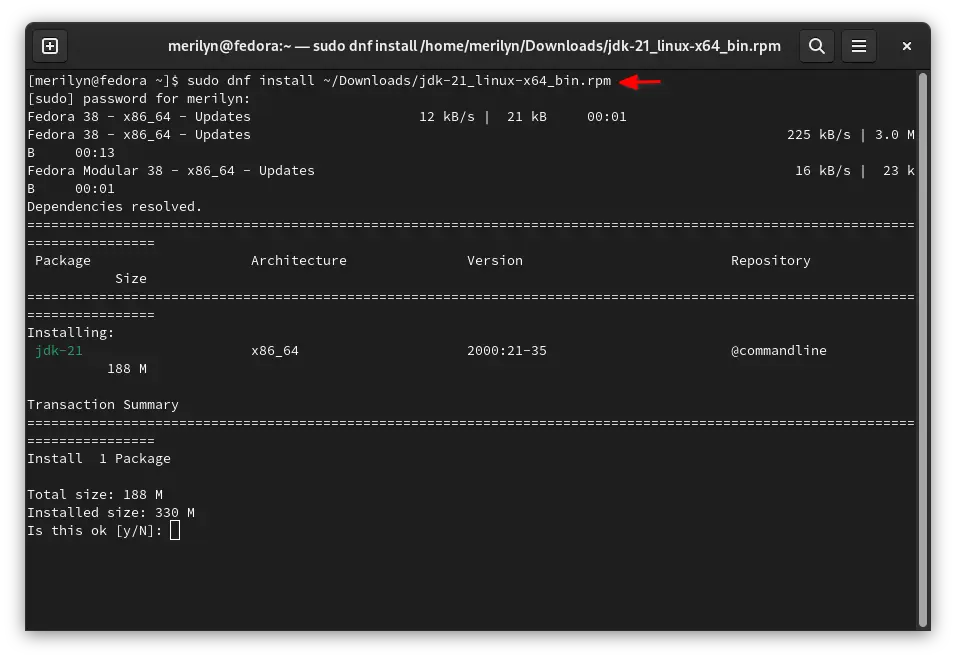
Or, search for and open terminal, then run the dnf command in Fedora based systems:
sudo dnf install ~/Downloads/jdk-*.rpm
And for openSUSE, use the zypper command to install the RPM package:
sudo zypper install ~/Downloads/jdk-*.rpm
When done, just go bottom step to verify.
Install the compressed archive for other Linux
For other Linux, just grab the ‘.tar.gz’ tarball, then extract to the system directory (usually ‘/usr/lib/jvm’).
First, search for and open terminal from start menu. Run command to create the destination folder in case it does not exist:
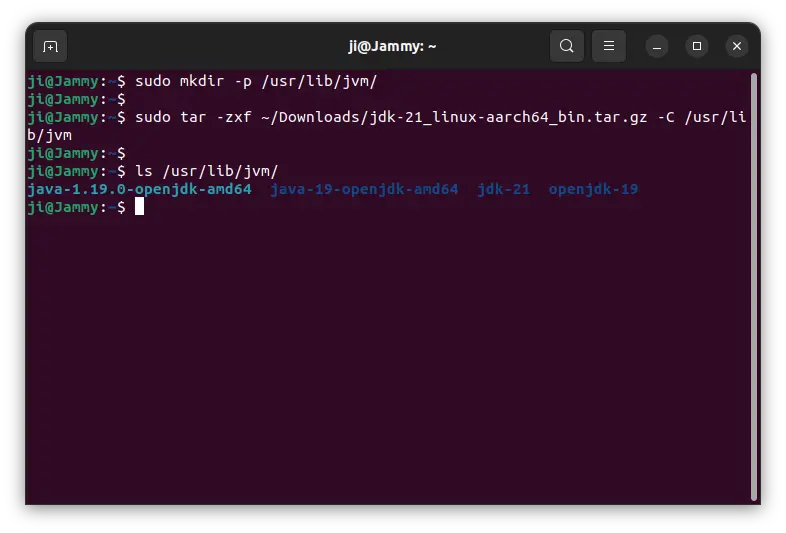
sudo mkdir -p /usr/lib/jvm
Then, run command to extract Java tarball to that folder:
sudo tar -zxf ~/Downloads/jdk-21_linux-aarch64_bin.tar.gz -C /usr/lib/jvm
Change "jdk-21_linux-aarch64_bin.tar.gz" depends on which package you downloaded.
Finally, do next steps to set Java environment variables.
Step 2: Set Java Home, $PATH environments
Installing RPM and Debian package will AUTOMATICALLY set all things up!!
So, only follow this step if you installed it via "Compressed Archive"
Set this Java as default in Debian/Ubuntu
For Debian and Ubuntu based systems, update-alternatives is the good choice to create symbolic links for having multiple Java versions.
First, open terminal from start menu (press Ctrl+Alt+T in Ubuntu) and run command to create symbolic links:
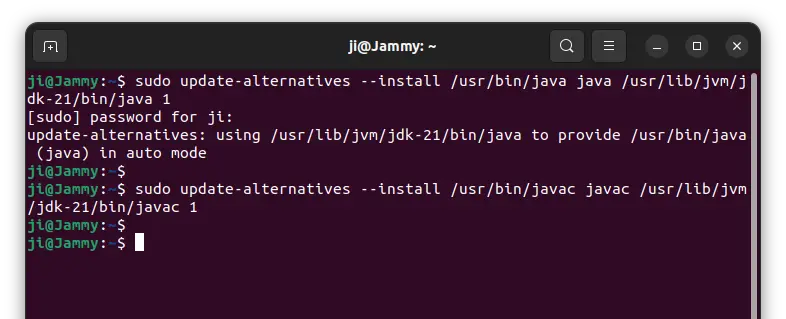
sudo update-alternatives --install /usr/bin/java java /usr/lib/jvm/jdk-21/bin/java 1
sudo update-alternatives --install /usr/bin/javac javac /usr/lib/jvm/jdk-21/bin/javac 1
Replace 'jdk-21' according to the Java version you installed.
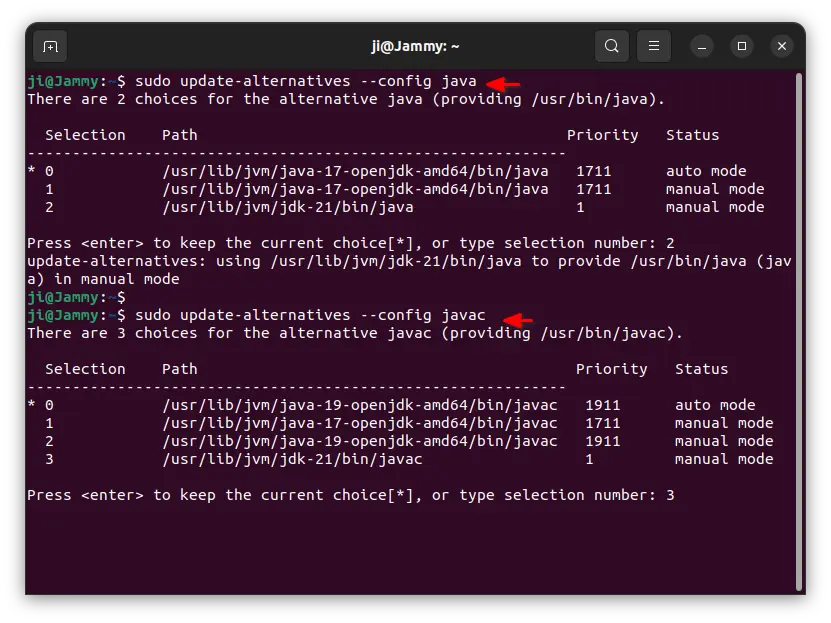
You may then run the commands below one by one to configure the executable files and select desired one as default.
sudo update-alternatives --config java
sudo update-alternatives --config javac
Setup Java Home & $PATH variables
To add the Java directory to your $PATH and setup Java Home, either edit ‘/etc/profile’ for global or ‘~/.bashrc’ for current user only.
For easy management, here I’m going to create 2 script files under ‘/etc/profile.d‘ directory for global use.
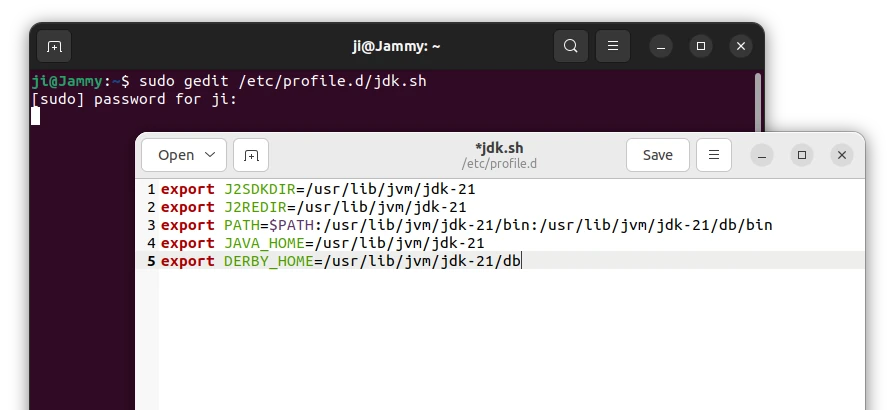
1. First, open terminal and run command to create /etc/profile.d/jdk.sh for Bourne Shell:
sudo gedit /etc/profile.d/jdk.sh
replace 'gedit' with your system text editor, or use nano that works in most Linux.
When the file opens, page the lines below and save it (For nano, press Ctrl+X, type y and hit Enter):
export J2SDKDIR=/usr/lib/jvm/jdk-21
export J2REDIR=/usr/lib/jvm/jdk-21
export PATH=$PATH:/usr/lib/jvm/jdk-21/bin:/usr/lib/jvm/jdk-21/db/bin
export JAVA_HOME=/usr/lib/jvm/jdk-21
export DERBY_HOME=/usr/lib/jvm/jdk-21/db
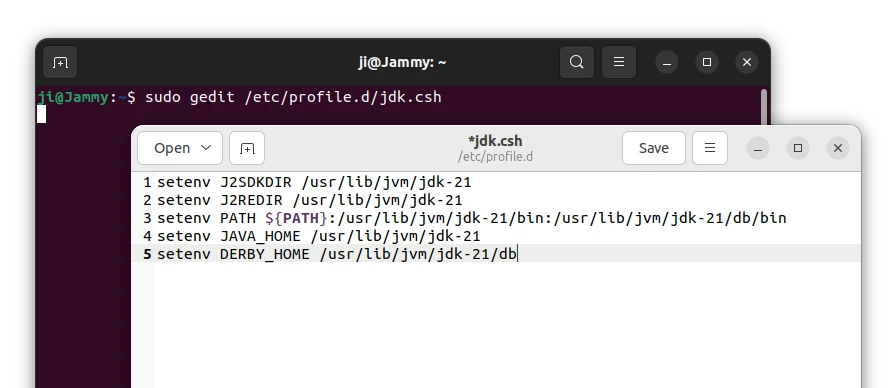
2. Then, create /etc/profile.d/jdk.csh for C Shell:
sudo gedit /etc/profile.d/jdk.csh
input the lines below and save it:
setenv J2SDKDIR /usr/lib/jvm/jdk-21
setenv J2REDIR /usr/lib/jvm/jdk-21
setenv PATH ${PATH}:/usr/lib/jvm/jdk-21/bin:/usr/lib/jvm/jdk-21/db/bin
setenv JAVA_HOME /usr/lib/jvm/jdk-21
setenv DERBY_HOME /usr/lib/jvm/jdk-21/db
Also, change jdk-21 according to Java version you installed.
To apply the changes, you need to log out and then back in.
Verify
Finally, verify java version via command:
java -version
javac -version
And verify Java home via:
java -XshowSettings:properties -version
Summary
Installing Oracle Java in Linux today is quite easy. In general, just download and install the RPM/Debian package depends on your Linux. It automatically setup Java HOME and make it as default.
For other Linux, user need to manually extract the compressed tarball to ‘/usr/lib/jvm’ and setup $PATH and java home. For system without update-alternatives, add Java directory to the beginning of $PATH variable will make Linux use it as first choice.