


This is a step by step beginner’s guide shows how to install NVIDIA driver in Debian 13 Trixie from the official non-free repository.
Unlike Ubuntu, NVIDIA driver in Debian repository is a bit outdated. It has NVIDIA 550.163.01 so far, while the latest has reached 580 series.
Step 1: Enable non-free repository
For Debian, the NVIDIA driver package is available in the non-free repository, which is however not enabled by default.
Previously, we can use add-apt-repository command or Software & Updates (software-properties-gtk) to enable the repository. They are however not available in Debian 13.
To enable the non-free repository, launch terminal and run the command below to manually edit the source file via nano command line text editor:
sudo nano /etc/apt/sources.list
When file opens in terminal, add contrib non-free (and non-free-firmware if not present) at the end of each source line.
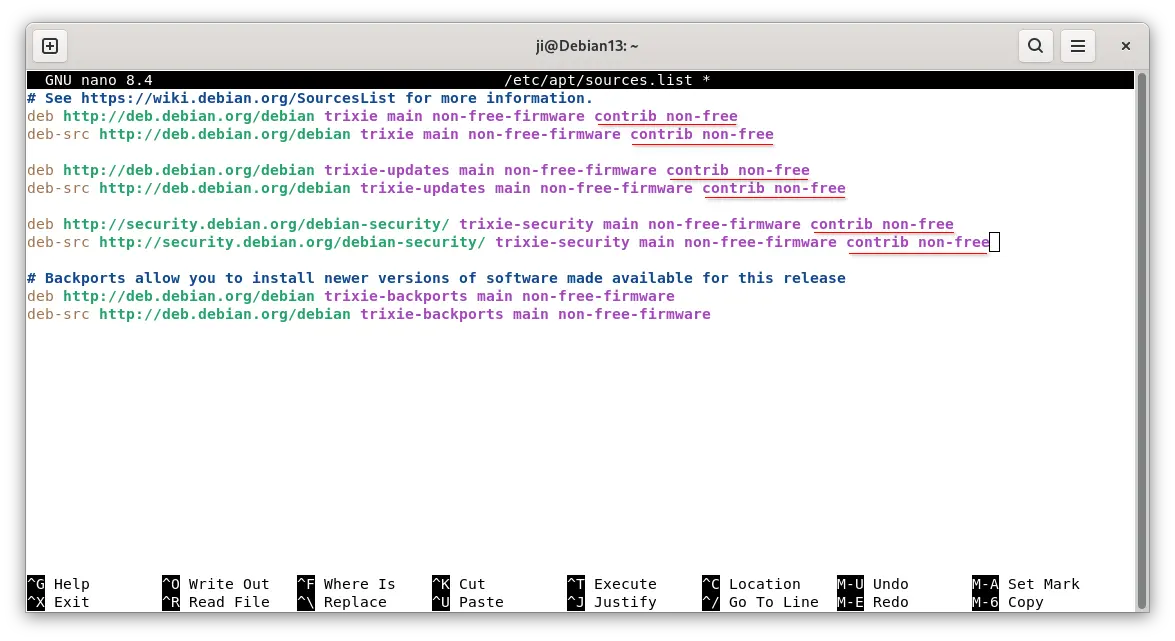
After that, press Ctrl+S to save, Ctrl+X to exit the editor. Finally, run the command below to refresh package cache:
sudo apt update
Step 2: Enroll MOK key for Secure Boot
Debian updates its kernel (minor versions) regularly for security updates and fixes. Without re-building kernel modules every time, DKMS is used, which however needs be signed for secure boot using a machine owner key (MOK).
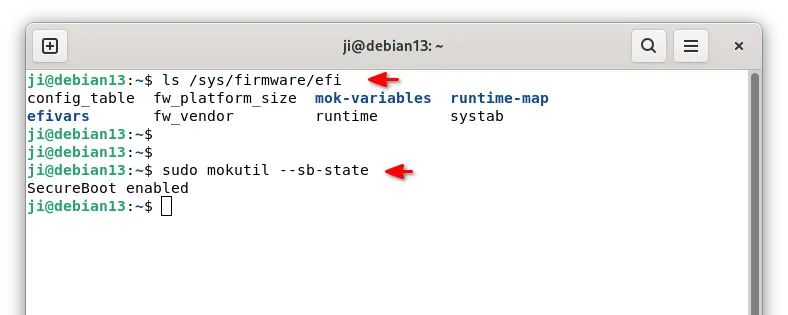
1. First, run the command below to check if Debian was installed with UEFI boot by running the command below in terminal:
ls /sys/firmware/efi
The command tells to list the /sys/firmware/efi directory content. If it says “No such file or directory”, then you have Debian installed as legacy boot.
2. Next, run command to check if secure boot enabled:
sudo mokutil --sb-state
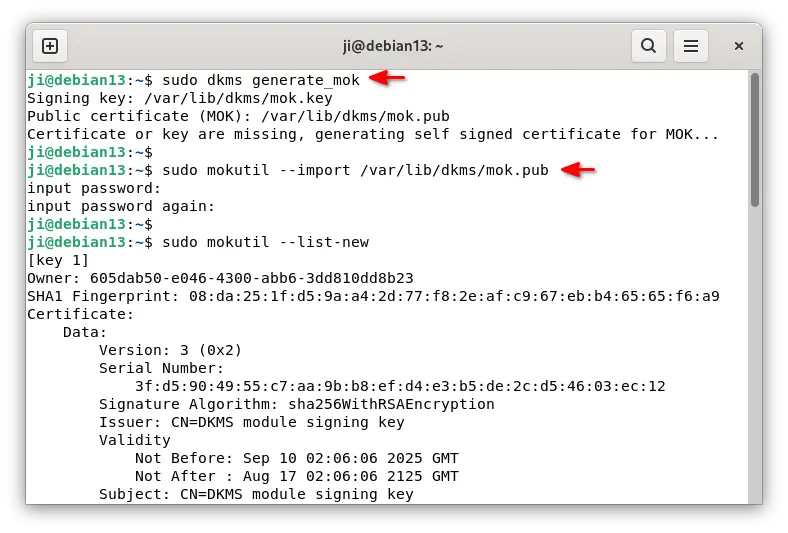
If both UEFI and secure boot enabled (as the screenshot below shows you), then you need to run commands below one by one to create and enroll MOK key.
3. First, run the command below to manually generate a mok key.
sudo dkms generate_mok
Run sudo apt install dkms if the dkms command not found, and set a password for the key.
4. Next, run command to import the key:
sudo mokutil --import /var/lib/dkms/mok.pub
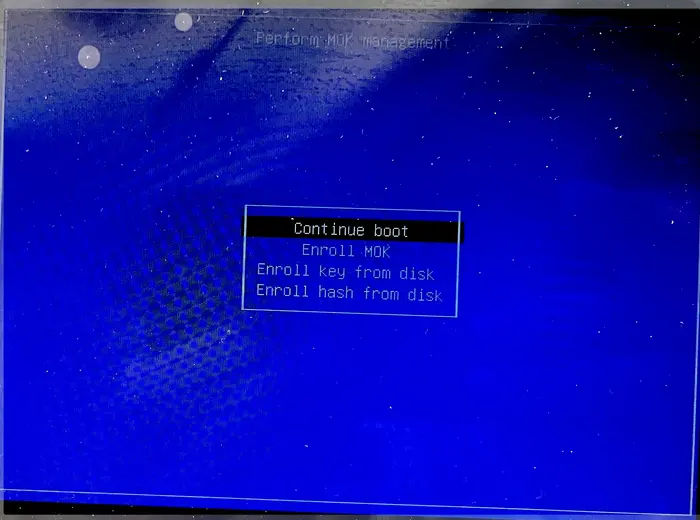
5. Finally, reboot your computer. At next boot, it should pop-up a screen (see the screenshot below), asking to perform MOK menagement.
There, just choose to Enroll MOK -> continue -> confirm -> enter password (you set when creating the key) -> reboot.
Step 3: Install NVIDIA Driver
After enabled non-free repository and enrolled MOK key, you may then run the commands below to install NVIDIA driver.
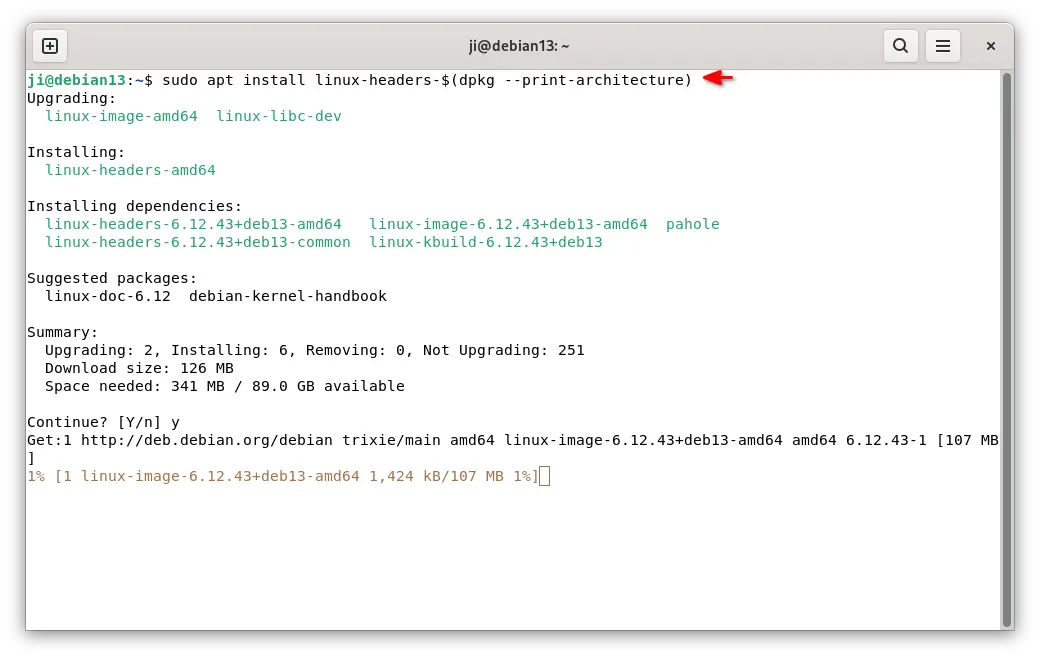
First, install the kernel headers for DKMS:
sudo apt install linux-headers-$(dpkg --print-architecture)
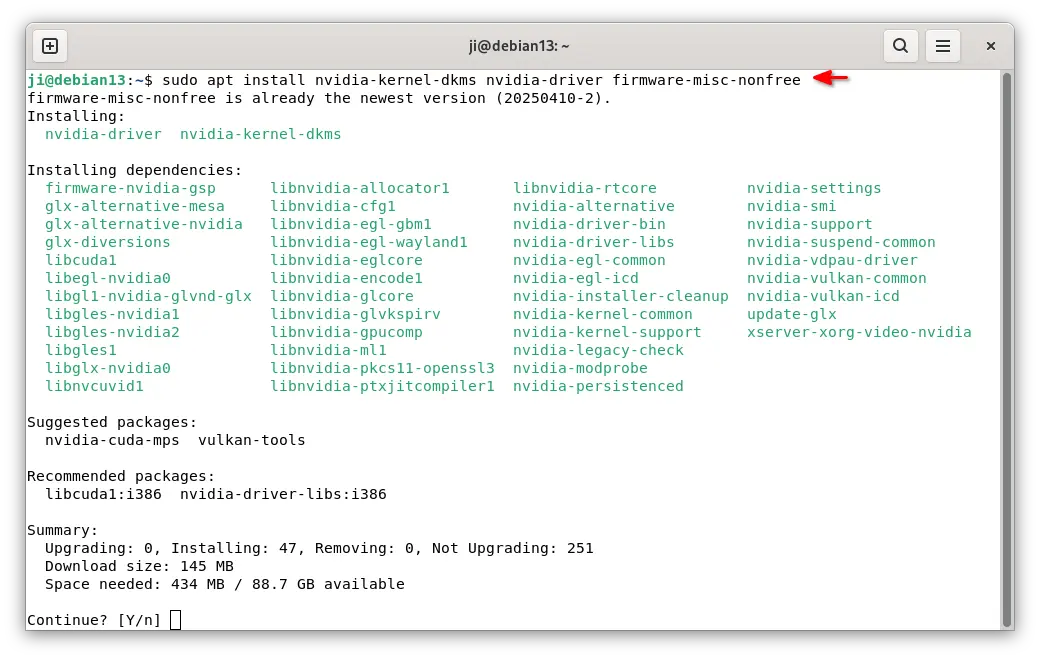
Then, install NVIDIA proprietary driver via command:
sudo apt install nvidia-kernel-dkms nvidia-driver firmware-misc-nonfree
Here replace nvidia-kernel-dkms with nvidia-open-kernel-dkms for the ‘open’ flavor.
After reinstalled the driver, restart your computer.
Step 4: Enable Wayland for GNOME, KDE Plasma
For GNOME or KDE Plasma users, it may fall back to the classic Xorg session after installed the NVIDIA driver. If you need Wayland session, then do following steps one by one.
First, run command to edit the Grub boot-loader configuration file:
sudo nano /etc/default/grub
Then, add nvidia-drm.modeset=1 nvidia-drm.fbdev=1 to value of GRUB_CMDLINE_LINUX_DEFAULT.

After that, press Ctrl+S to save, Ctrl+X to exit, finally run sudo update-grub command to apply change.
Next, edit nvidia-options.conf file via the command below:
sudo nano /etc/modprobe.d/nvidia-options.conf
Then, enable (remove # at its beginning) or add the line below.
options nvidia-current NVreg_PreserveVideoMemoryAllocations=1

Finally, save file (Ctrl+S) and exit (Ctrl+X). And, you should be able to choose Wayland session from login screen in next boot.
Step 5: Switch between NVIDIA and Integrated GPU
For laptops with both integrated GPU and dedicated NVIDIA GPU, it by default works in hybrid mode after installed the driver.
Start App/Game via NVIDIA GPU while leaving all others handled by integrated GPU
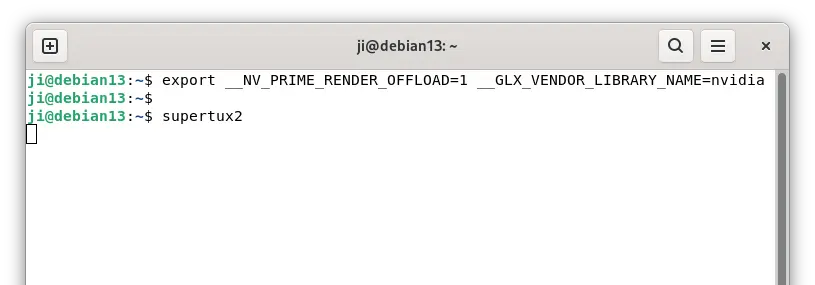
To run an app or game using NVIDIA GPU, while leaving all others handled by integrated GPU, first run command to set up environment:
export __NV_PRIME_RENDER_OFFLOAD=1 __GLX_VENDOR_LIBRARY_NAME=nvidia
Then, any app or game started from that terminal window, will render via the NVIDIA GPU.
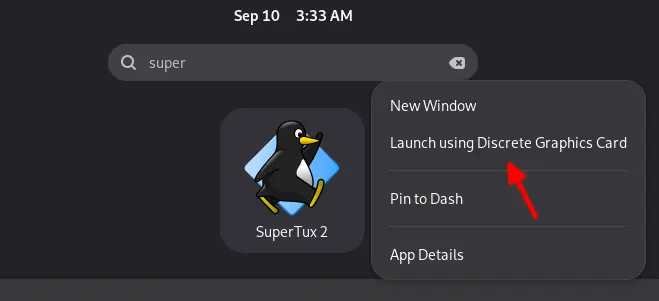
For GNOME, simply right-click on the app or game and choose “Launch using Discrete Graphics Card”.
Switch to NVIDIA or Integrated GPU Only Mode
NOTE: Don’t know why, but this step does NOT work in Wayland session in my case!
Unlike Ubuntu, Debian don’t have nvidia-prime package for switching between integrated and NVIDIA GPU. There’s however a free open-source tool ‘envycontrol‘ that can do the job.
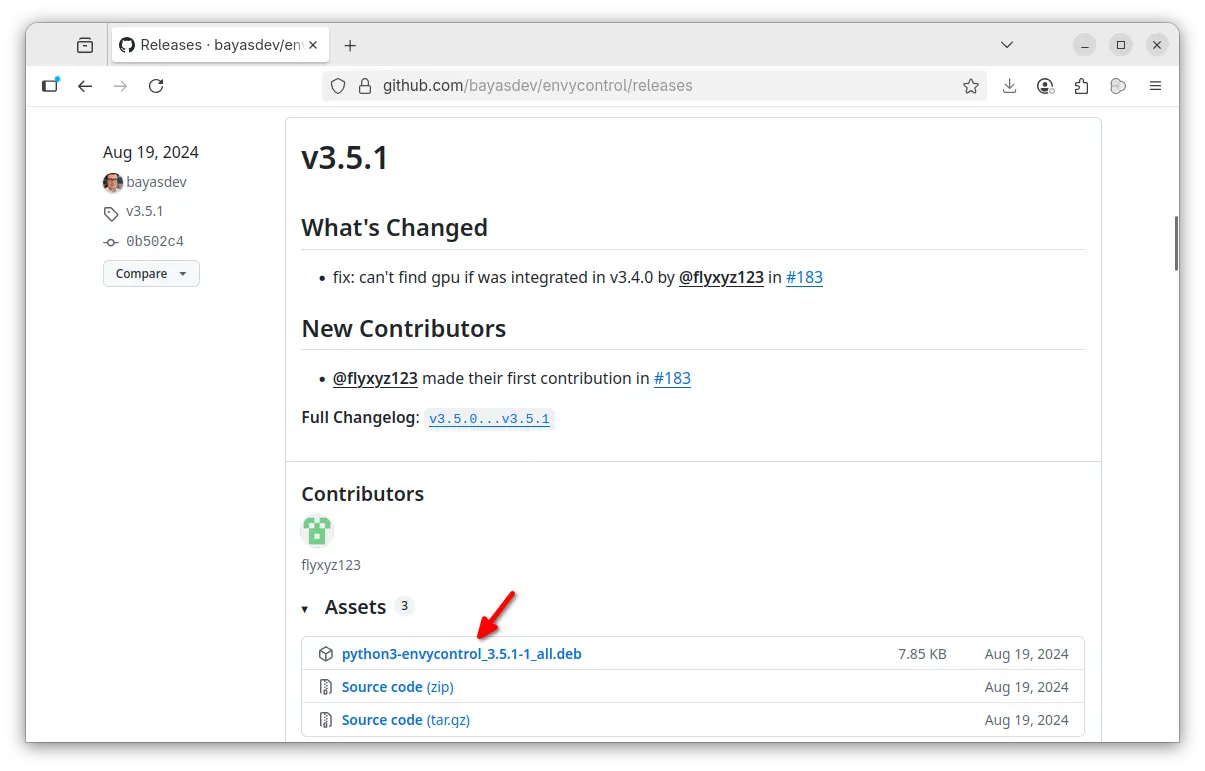
1. Firstly, download the software package from its releases page (its ‘python3-envycontrol_xxx_all.deb‘):
2. Once you downloaded the package, open terminal and run command to install it (assume you saved it in ‘Downloads’ folder):
sudo apt install ~/Downloads/python3-envycontrol*.deb
3. When done installing envycontrol, you can run one of the commands to tell which GPU to use:
- Switch to integrated GPU (Intel or AMD):
sudo envycontrol -s integrated
- Set hybrid mode and enable fine-grained power control:
sudo envycontrol -s hybrid --rtd3
- Switch to NVIDIA and enable ForceCompositionPipeline in case of screen tearing:
sudo envycontrol -s nvidia --force-comp
When done switching GPU, remember to restart computer to apply change.
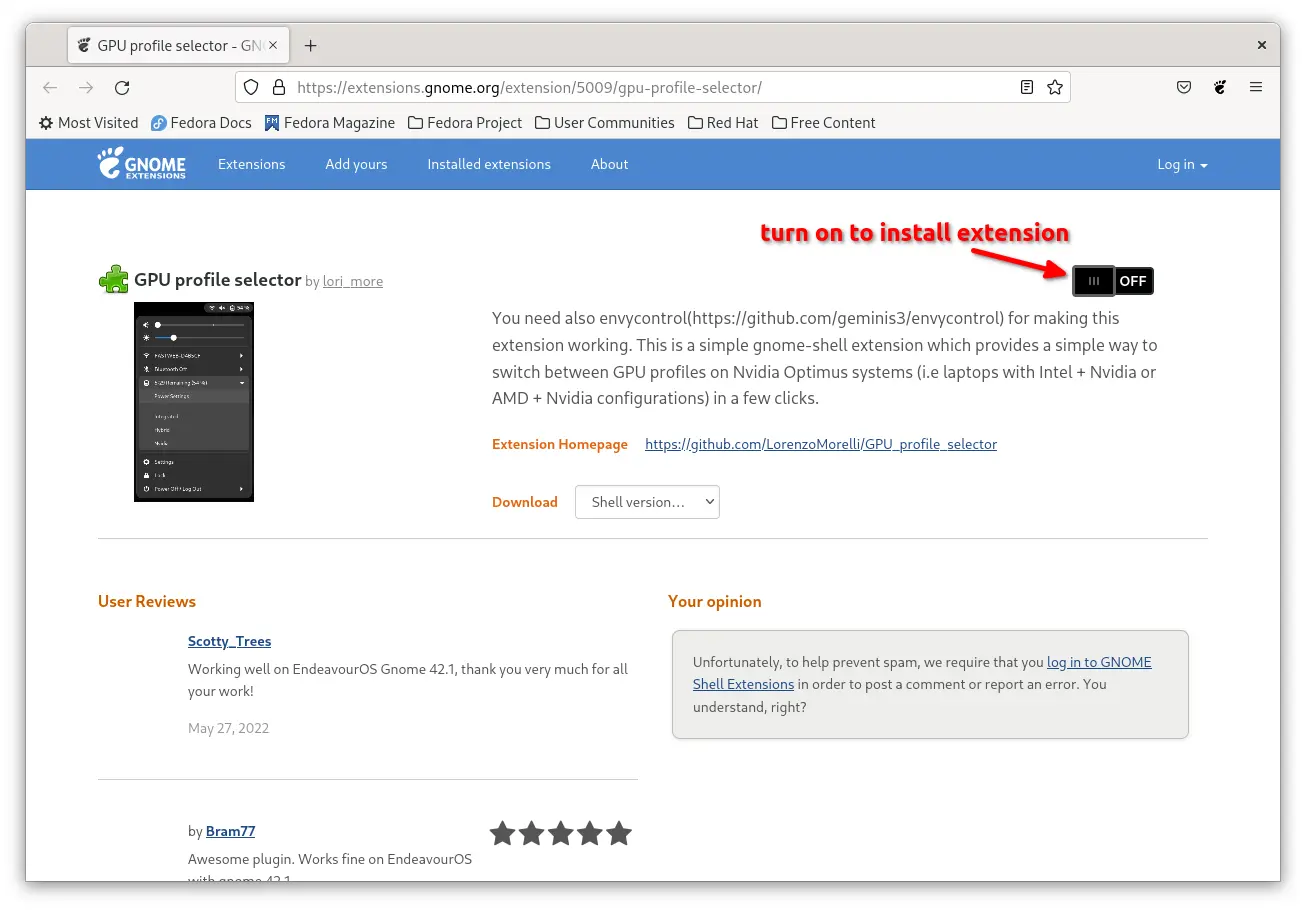
4. For GNOME desktop, user may also install the ‘GPU profile selector’ extension, by using ON/OFF switch in the link below page:
If you don’t see the ON/OFF switch, install browser extension via link in that page, then refresh the page. Also, run the command below to install agent package:
sudo apt install gnome-browser-connector
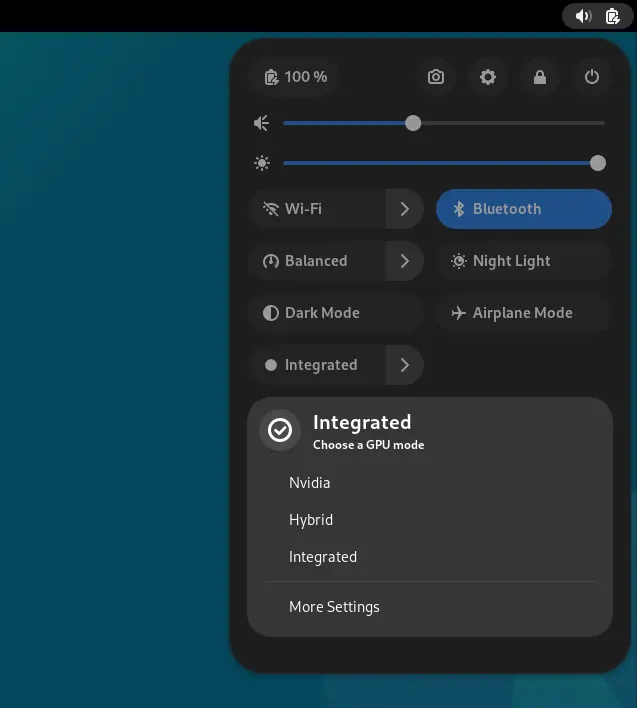
When done, you should be able to switch GPU via the top-right corner system menu (aka Quick Settings).
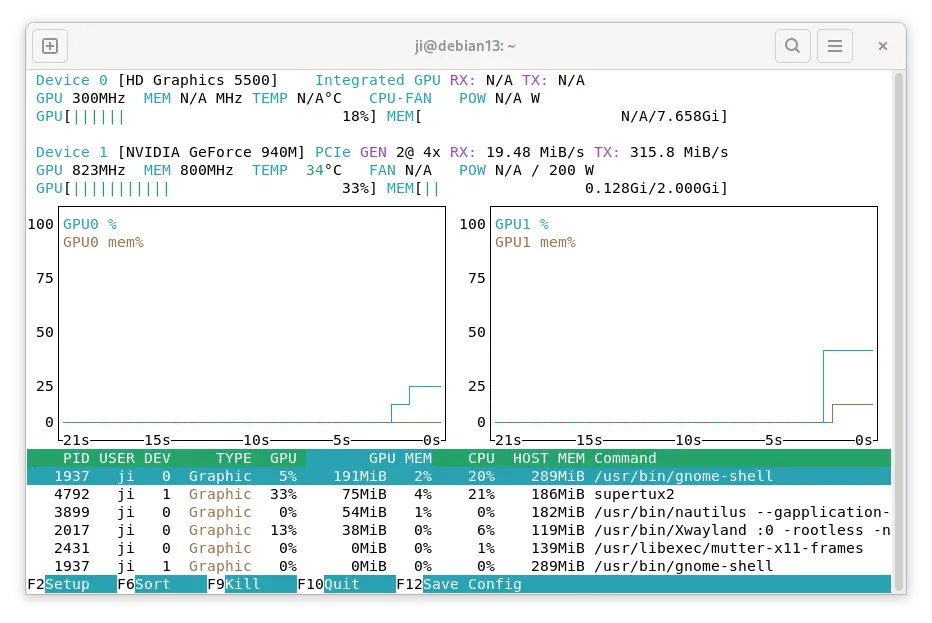
Step 6: Verify & Monitor GPU Usage
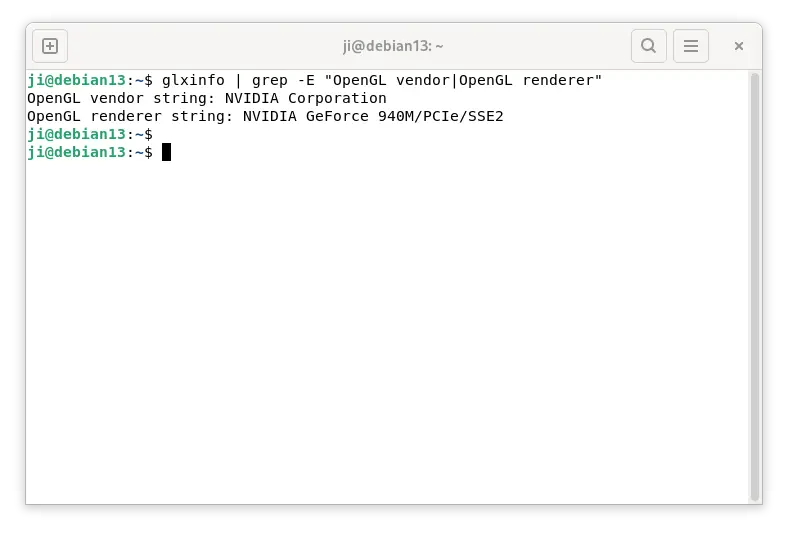
On Xorg session, you may run the command below to tell which GPU is currently in use:
glxinfo |grep -E "OpenGL vendor|OpenGL renderer"
And, by running sudo apt install nvtop command, you may then run nvtop command to monitor your GPU usage.
In addition for those who have system sleep and resume issue, try to start the following 3 services which may help:
sudo systemctl enable nvidia-suspend.service
sudo systemctl enable nvidia-hibernate.service
sudo systemctl enable nvidia-resume.service
For more, read the official Debian wiki page.