This simple tutorial shows how to install and setup Node.js, the popular JavaScript runtime environment, in Ubuntu 22.04 LTS.
Node.js is available in Ubuntu system repositories, but always old. For the latest version, the software provides official Snap package and portable Linux tarball. As well, the popular nodesource repository offers native .deb for Debian/Ubuntu, and .rpm for Fedora based systems.
Though the title said for Ubuntu 22.04, the methods below also work in other Linux, such as Debian, Fedora, CentOS, RHEL, and more.
Option 1: Node.js Snap package
The OpenJS Foundation offers official Snap package for Node.js 18.x, 16.x, 14.x. It’s a containerized software package runs in sandbox.
Ubuntu user (since 20.04) can easily search for and install ‘nodejs‘ from Ubuntu Software App. Then use the top-right source selection box to choose a desired version to install.
As you can see, not only for current versions, user can even install the old Node.js 6, 8, 9, 10, 11, 12, 13, 14, 15 and 17 via Snap. And, they are available in both modern 64-bit and ARM 32/64 CPU architectures.
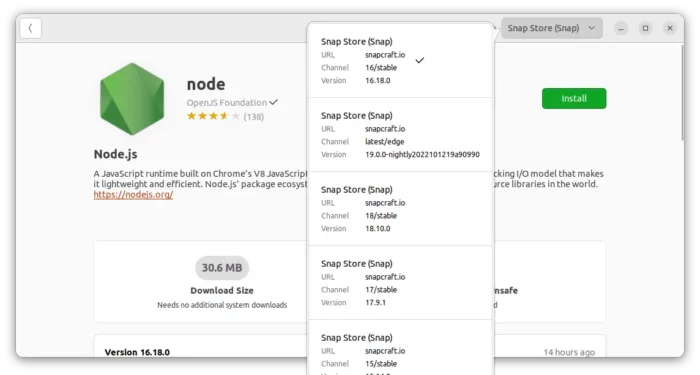
As an universal package format, the Snap package also works in other Linux. To get it, go to snapcraft.io/node
Option 2: Install & setup the official tarball
The nodejs website provides official Linux package as portable tarball. User can download the package from the link below:
In case you try downloading it from another machine, click on “Other Downloads” link in that page, and select download your desired package:
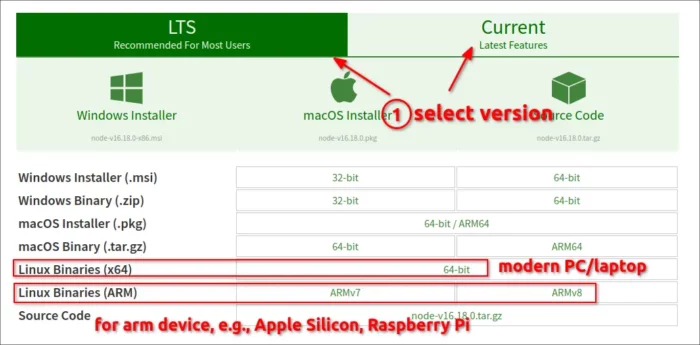
As a portable package, you may just extract the tarball, and run executable to start using Node.js. Or, do following steps to install with well integration.
Install for current user use:
After downloading the tarball, extract it into user’s “.local” folder will install it for single user use.
1. To do so, right-click on blank area of your ‘Downloads’ folder that contains the tarball. Then, select ‘Open in Terminal’ to open terminal with that folder as working directory:
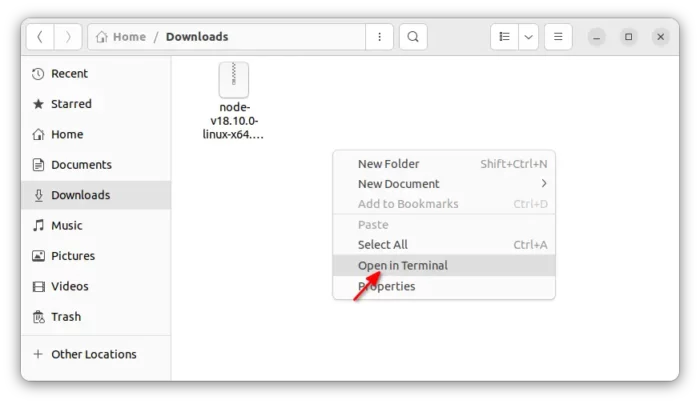
2. When terminal opens, run command to extract Node.js tarball to ‘.local’ folder:
tar Jxf node-*-linux-*.tar.xz --strip-components=1 -C ~/.local/
In case the website change the tarball format in future, replaceJxfin command withjxffor '.tar.bz' orzxffor '.tar.gz'
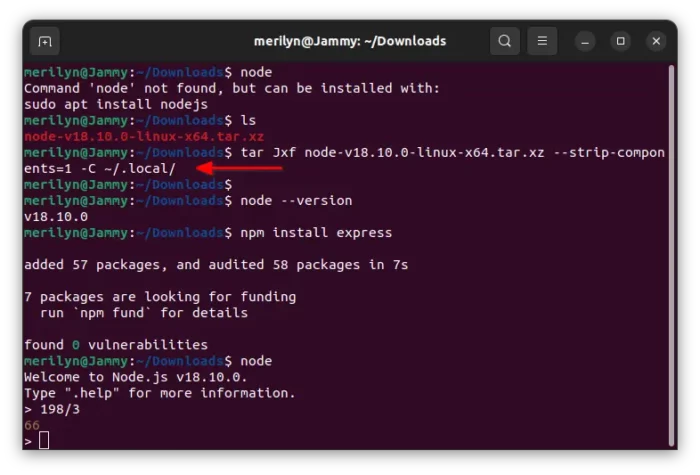
This command will extract node, npm, npx executable files into .local/bin, and other run-time libraries as sub-folders under .local.
3. After that, run node --version to check version, node to start IDE, or npm install -g PACKAGE to install a package.
NOTE: -g flag is required to install something via npm, or it only downloads modules into current working directory.
Install the tarball for global use:
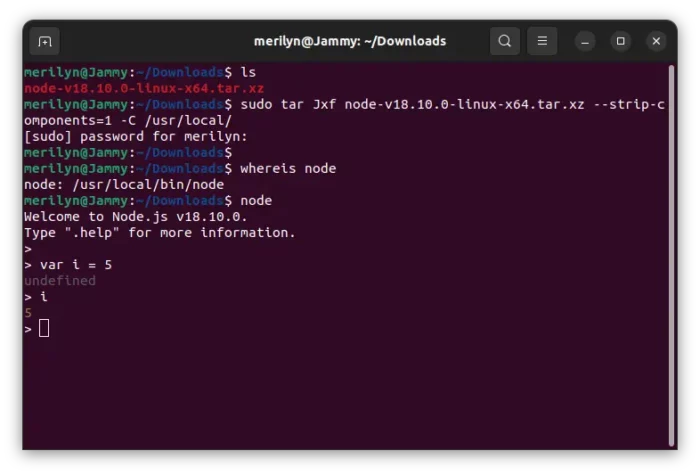
To install it for all users in your system, simply extract the tarball into ‘/usr/local‘.
Also, open ‘Downloads’ folder by right-clicking in blank area in that folder, and select ‘Open in terminal’. Finally, run command:
sudo tar Jxf node-*-linux-*.tar.xz --strip-components=1 -C /usr/local/
After that, verify via node --version, npm install -g PACKAGE, and enjoy!
How to Remove Node.js
To uninstall node.js, simply remove all the files that your extracted.
1. For single use installation, open terminal and run commands one by one to remove the corresponding files or folders:
cd ~/.local && rm CHANGELOG.md LICENSE README.md
cd ~/.local/bin/ && rm corepack node npm npx
cd ~/.local/share/ && rm -R man doc systemtap
rm -R ~/.local/include/node/
2. For global installation, remove following files and folders via sudo commands:
cd /usr/local/ && sudo rm CHANGELOG.md LICENSE README.md
cd /usr/local/bin && sudo rm corepack node npm npx
cd /usr/local/share/ && sudo rm -R man doc systemtap
sudo rm -R /usr/local/include/node/
Option 3: Install native DEB/RPM via NodeSource
If you would like to install the latest version via native .deb or .rpm package, and keep it updated, NodeSource repository is a good choice. It seems to be UNOFFICIAL but popular source and Nodejs refers to it in its website.
The repository keep building the 64-bit, armhf/arm64 packages of Node.js current and LTS with support for all current Ubuntu releases, Debian, RHEL, Fedora, and other Linux.
1. Setup source repository & install Node.js
It’s quite easy to setup the repository because it provides installer scripts for all supported systems.
Simply open a terminal window (Ctrl+Alt+T) and run one of the 2 commands below to get things done:
- setup NodeSource repository and install Node.js current (v18.x at the moment) via command below:
curl -fsSL https://deb.nodesource.com/setup_current.x | sudo -E bash - &&\
sudo apt-get install -y nodejs
- Or, setup and install LTS version instead via command:
curl -fsSL https://deb.nodesource.com/setup_lts.x | sudo -E bash - &&\
sudo apt-get install -y nodejs
Paste either command in terminal and hit Enter to run to install your desired version. Type user password to authenticate, it will do all other things automatically.
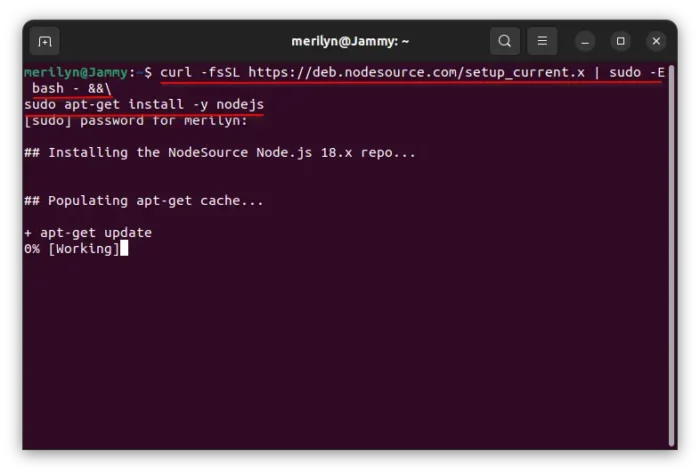
After installation, run node, node --version, npm install commands to verify.
For other Linux systems, go to github.com/nodesource/distributions
(Optional)Uninstall NodeSource repository & Node.js
The script created source file under /etc/apt/sources.list.d, and downloaded key file to /usr/share/keyrings.
To remove the source file and key, just open terminal (Ctrl+Alt+T) and run the commands below one by one:
sudo rm /etc/apt/sources.list.d/nodesource.list
sudo rm /usr/share/keyrings/nodesource.gpg
Then, refresh your system package cache via the command below will done removing the source repository:
sudo apt update
To remove the Nodo.js JavaScript runtime environment, just run apt command:
sudo apt remove --autoremove nodejs
Summary
In short, there are 3 ways to install the latest Node.js packages in Ubuntu Linux. They are the official Snap package and Linux tarball, and third-party NodeSource repository. And, all of them support 64-bit and arm64/armhf devices.
The Snap is quite easy to install and supports even old versions, though it runs in sandbox. While the Linux tarball need to be manually extracted to either user’s .local or /usr/local directory. NodeSource repository works as a PPA which installs the latest package and keeps it up-to-date along with other system packages via ‘Software Updater’ (Update Manager).








Recent Comments