

Want to use SeaMonkey internet suite? Here’s the step by step how to install guide for Ubuntu 20.04, Ubuntu 22.04, Debian 11 and their derivatives such as Linux Mint.
About SeaMonkey:
SeaMonkey is a free open-source all-in-one internet suite, that is created as a continuation of the Mozilla’s application suite. Since Mozilla now focuses on their stand-alone projects Firefox and Thunderbird.
The software is NOT available in Ubuntu / Debian repositories, but itself offers Linux tarball for 32-bit & 64-bit PC. As well, the Ubuntuzilla project re-built the package to make it easy to install & update.
Method 1: Install SeaMonkey via Official Linux Tarball:
The official tarball works on most Linux, including Ubuntu, Debian, Fedora, Arch, CentOS and more.
1. Download SeaMonkey:
Firstly, download the tarball from the link below (Linux x64 for 64-bit, Linux x86 for 32-bit OS):

Don't known your OS type? Check in System Settings' About page or run uname -m in terminal!
2. Extract Tarball:
Secondly, extract the package into /opt directory for global use. You may choose to extract to user’s home directory for single user use only. Though, you have to change ‘Exec‘ and ‘Icon‘ value accordingly in step 3.
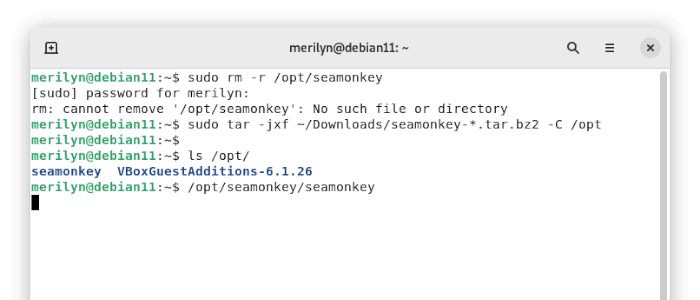
- Open terminal from start menu, and run command to remove old SeaMonkey folder if any:
sudo rm -r /opt/seamonkey
- Next, extract it to
/opt(Here assume that you’ve downloaded the tarball into Downloads folder):sudo tar -jxf ~/Downloads/seamonkey-*.tar.bz2 -C /opt
- Finally, try launching the app via command:
/opt/seamonkey/seamonkey
3. Create App Starter:
If everything goes OK, now create the app starter so you may launch it from system start menu (‘Activities‘ overview).
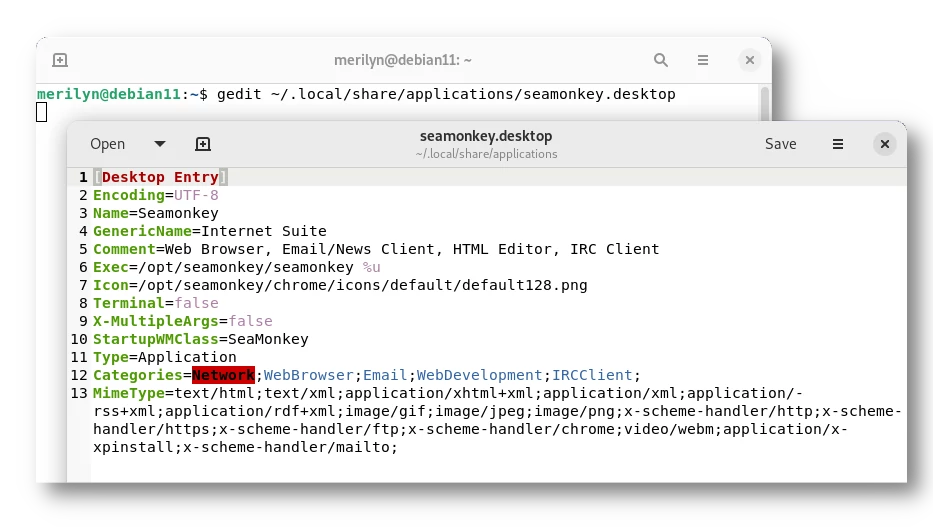
Open a terminal window (for Ubuntu, just press Ctrl+Alt+T on keyboard) from system start menu. When terminal opens, run command to create a starter (.desktop) file:
gedit ~/.local/share/applications/seamonkey.desktop
For non-GNOME desktop, replace gedit with other text editor or universal nano text editor. And Ubuntu 22.10 + now uses gnome-text-editor as default.
The command will create and open an empty file in text editor. When it opens, paste the lines below and save it:
Change the values of ‘Exec’ and ‘Icon’ accordingly, if you didn’t extract the tarball into ‘/opt’.
[Desktop Entry]
Encoding=UTF-8
Name=SeaMonkey
GenericName=Internet Suite
Comment=Web Browser, Email/News Client, HTML Editor, IRC Client
Exec=/opt/seamonkey/seamonkey %u
Icon=/opt/seamonkey/chrome/icons/default/default128.png
Terminal=false
X-MultipleArgs=false
StartupWMClass=SeaMonkey
Type=Application
Categories=Network;WebBrowser;Email;WebDevelopment;IRCClient;
MimeType=text/html;text/xml;application/xhtml+xml;application/xml;application/rss+xml;application/rdf+xml;image/gif;image/jpeg;image/png;x-scheme-handler/http;x-scheme-handler/https;x-scheme-handler/ftp;x-scheme-handler/chrome;video/webm;application/x-xpinstall;x-scheme-handler/mailto;
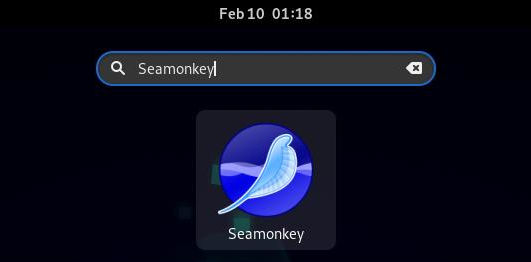
After that, search for and open SeaMonkey from ‘Activities‘ overview or start menu and enjoy!
Method 2: Install SeaMonkey via Ubuntuzilla Repository:
To make life easy for Ubuntu, Debian, Linux Mint, etc users, the Ubuntuzilla repository provides the rebuild of the official package (see Method 1) with well desktop integration.
It’s unofficial but makes install and update SeaMonkey as easy as system’s own package.
1. Setup Ubuntuzilla Apt Repository:
The apt repository works on all Ubuntu, Debian and their based Linux systems. Firstly, search for and open terminal from start menu. When it opens, run the commands below one by one:
- First, download the key from ubuntu key server and install it into /user/share/keyring directory. This can be done via the single command:
sudo gpg --no-default-keyring --keyring /usr/share/keyrings/ubuntuzilla.gpg --keyserver keyserver.ubuntu.com --recv-keys 2667CA5C
Type user password when it asks though there’s no visual feedback and hit Enter.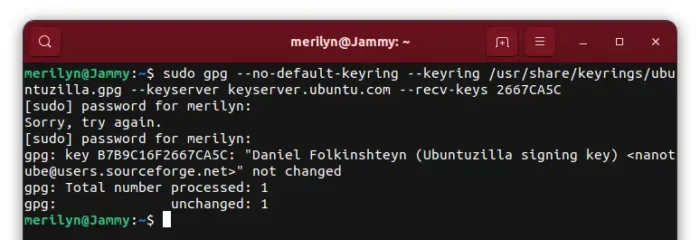
- Then create the config file “ubuntuzilla.list” under “/etc/apt/sources.list.d“. Write the source URL and specify the key into the file. Also, it can be done via single command below:
printf 'deb [signed-by=/usr/share/keyrings/ubuntuzilla.gpg] https://downloads.sourceforge.net/project/ubuntuzilla/mozilla/apt all main\n' | sudo tee /etc/apt/sources.list.d/ubuntuzilla.list >/dev/null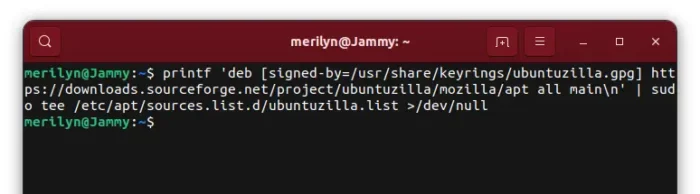
2. Install SeaMonkey via the apt repository:
After properly setup the repository, simply run command to refresh system package cache:
sudo apt update
The apt repository is hosted on sourceforge.net. If you got "Clearsigned file isn't valid, got 'NOSPLIT'" error, try VPN to change the download mirror automatically.
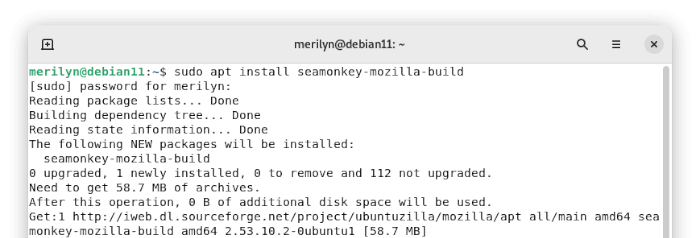
And, finally install the internet suite via:
sudo apt install seamonkey-mozilla-build
Finally, search for and open the software from system start menu and enjoy!
Remove SeaMonkey:
For the internet suite installed via ‘Method 1’, just remove the source folder via command:
sudo rm -r /opt/seamonkey
And remove the app starter via:
rm ~/.local/share/applications/seamonkey.desktop
To remove Ubuntuzilla repository, use options ‘Software & Updates‘ utility in both Other Software and Authentication tab:
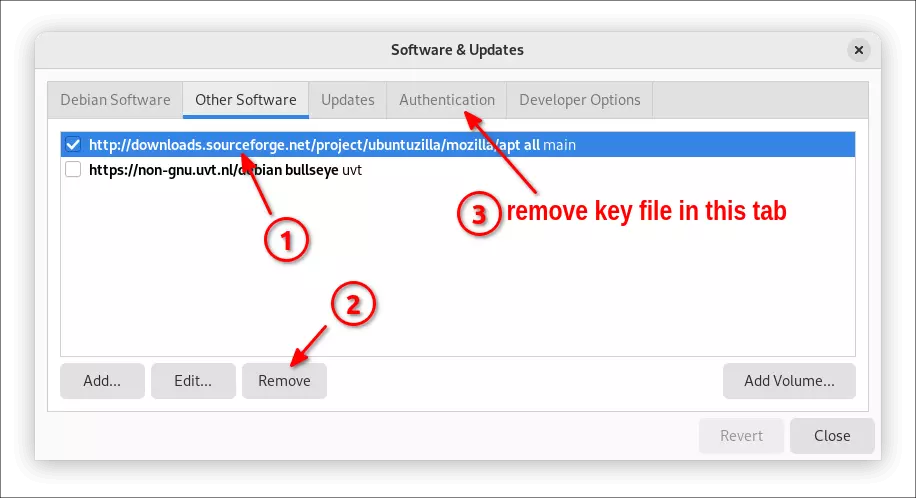
For non-GNOME desktop, just rm the source file for the apt repository as well as the key file by running command in terminal:
sudo rm /etc/apt/sources.list.d/ubuntuzilla.list /usr/share/keyrings/ubuntuzilla.gpg
And, remove SeaMonkey via apt command:
sudo apt remove --autoremove seamonkey-mozilla-build
That’s all. Enjoy!