This is a step by step beginner’s guide shows how to enable hibernation feature in Linux Mint. Though, the title said for Mint 22, it should also work in Linux Mint 21 & 20.
Hibernate moves all data from RAM into disk, then shuts down the computer. It uses less power than suspend which sleep to RAM. However, hibernate might NOT work for some PCs and in-compatible with secure boot, so it’s NOT enabled by default in most Linux.
To enable hibernate feature in Linux Mint, you need to do following steps one by one:
- First, disable secure boot in BIOS.
- Find out where is your Swap space, then tell Linux Kernel to resume from it on startup.
- Add ‘hibernate’ option into shutdown menu.
Step 1: Disable Secure Boot
The BIOS setting option for secure boot differs depends on your motherboard. So, I will not include the how-to here.
But to tell if secure boot enabled or not, you may press Ctrl+Alt+T to open terminal, and run command:
sudo mokutil --sb-state
Step 2: Locate the Swap device
Hibernate will try to store data into swap space in your disk. You need to find out where it is, before enabling this feature.
1. First, open terminal (Ctrl+Alt+T) and run command to show swap devices:
sudo swapon
In the output, you’ll see:
- either swap partitions, e.g.,
/dev/sdXYor/dev/nvmeXnYpX. - or swap file, such as
/swapfile
If more than one swap devices available, the one with high “PRIO” (priority) is needed.
If you see /dev/zramX in the output, then it does NOT support hibernation, since the swap device is available in RAM rather than in disk.
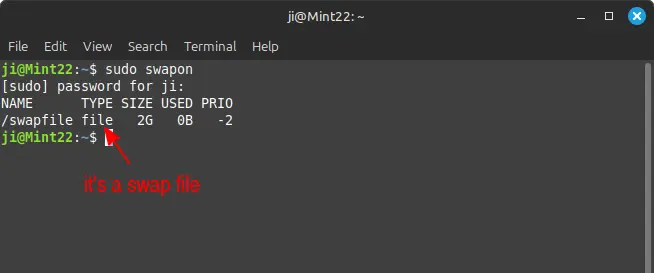
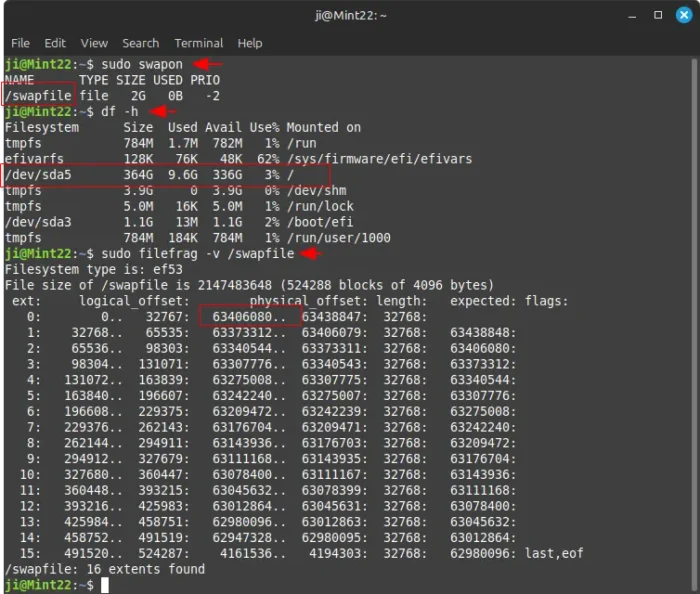
2. If your swap type is “file” (see the screenshot above), then you need to first run the command below to find out where is the root partition:
df -h
In the output, find out the device mounted on /.
Finally, run one more command to find out the start of physical offset of that swap file (replace /swapfile to yours, according to sudo swapon output).
sudo filefrag -v /swapfile
In my case, the swap file is on root (/dev/sda5), and the physical offset starts at 63406080.
Step 3: Add Kernel Parameter to resume from Swap
To easiest way to load kernel parameter at startup is using the default Grub boot-loader.
1. First, open terminal (Ctrl+Alt+T) and run command to edit the Grub config file:
sudo xed /etc/default/grub
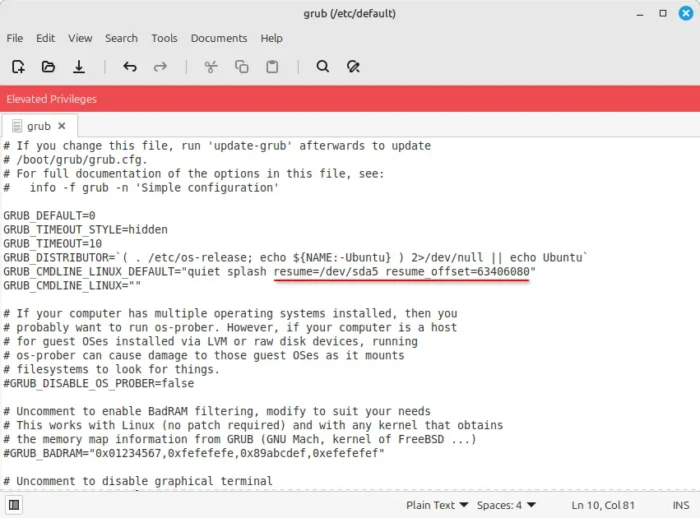
2. When file opens, find out the line “GRUB_CMDLINE_LINUX_DEFAULT”, then add the value below:
- If swap type is partition, then add resume=/dev/xxx (replace xxx according to
sudo swaponoutput). - If swap type is file, then add resume=/dev/xxx resume_offset=xxxxxxxx. In the case,
/dev/xxxis the root partition.
3. After saving the file, run the command below to apply!
sudo update-grub
Step 4: Add ‘Hibernate’ option to shutdown menu
For Linux Mint 22, simply run the command below in terminal to create & edit the config file:
sudo xed /etc/polkit-1/rules.d/10-enable-hibernate.rules
When file opens, add the lines below and save file:
polkit.addRule(function(action, subject) {
    if (action.id == "org.freedesktop.login1.hibernate" ||
        action.id == "org.freedesktop.login1.hibernate-multiple-sessions" ||
        action.id == "org.freedesktop.upower.hibernate" ||
        action.id == "org.freedesktop.login1.handle-hibernate-key" ||
        action.id == "org.freedesktop.login1.hibernate-ignore-inhibit")
    {
        return polkit.Result.YES;
    }
});
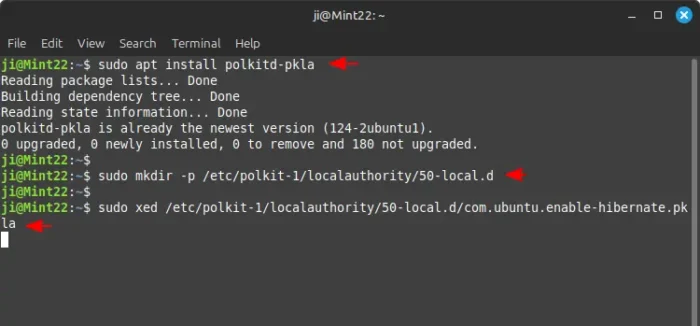
For old Linux Mint 21 and earlier, open terminal (Ctrl+Alt+T) and run command to ensure the polkitd-pkla package is installed.
sudo apt install polkitd-pkla
Then, run command to ensure the required directory exist:
sudo mkdir -p /etc/polkit-1/localauthority/50-local.d
Finally, create and edit the config file via command:
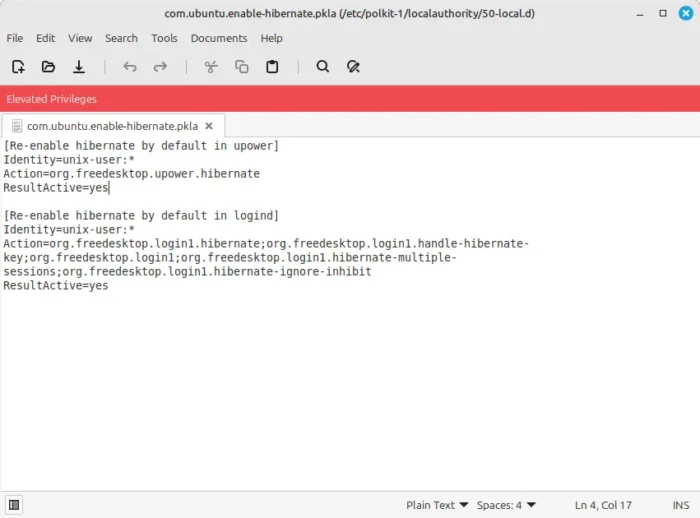
sudo xed /etc/polkit-1/localauthority/50-local.d/com.ubuntu.enable-hibernate.pkla
When file opens, add the lines below and save file:
[Re-enable hibernate by default in upower]
Identity=unix-user:*
Action=org.freedesktop.upower.hibernate
ResultActive=yes

[Re-enable hibernate by default in logind]
Identity=unix-user:*
Action=org.freedesktop.login1.hibernate;org.freedesktop.login1.handle-hibernate-key;org.freedesktop.login1;org.freedesktop.login1.hibernate-multiple-sessions;org.freedesktop.login1.hibernate-ignore-inhibit
ResultActive=yes
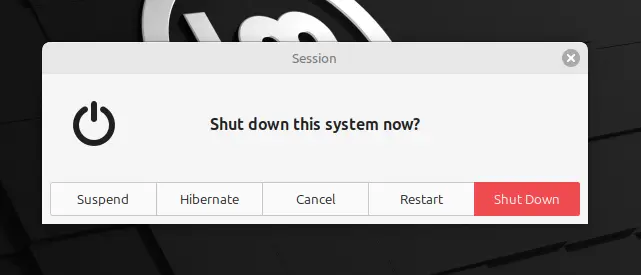
If everything’s done without error, you can now try to open shut-down menu and click “Hibernate”. When system goes down, press power button and see if it restores your system to the previous state.









thks for this doc
Enhancements proposed
a) use UUID more than device in the resume=xxx parameter
b) apply sudo grub-install as last step in case of multi-disks configuration
Worked but the experience is not as smoth as in say windows – when I press the hibernate button first nothing happens (while saving RAM to disk I assume) then screen goes dark, then back on again and finally machine hibernates. When starting again I come to a boot menu with coices to run Mint or do some BIOS stuff, then I finally come to the login and can enter my credentials.
Can any of this be further streamlined somehow?
Reply to Trist (June 24, 2025 at 4:38 am):
– You’re not alone —
and what you’re experiencing is unfortunately very common on Linux Mint 22 with NVIDIA GPUs.
– The “screen goes dark, then back on, then finally hibernates” behavior, followed by a full reboot/login instead of session restore, is often caused by
nvidia-drm.modeset=0
— which many users (myself included) must use to avoid black screens on DisplayPort or resume failures.
Here’s the core issue the article doesn’t mention:
✅ The kernel does resume correctly from swap — you see “resuming from…” → that part works.
✅ Hibernate is triggered and the system powers off.
❌ But Cinnamon does NOT restore your session
— because with modeset=0, the GPU reinitializes “fresh” on resume, and Cinnamon treats it as a new login — not a restored session.
➡️ Result: You end up at the login screen with no windows, no apps, no layout — as if you rebooted.
Workaround (if you insist on Hibernate):
Before hibernating, manually save your Cinnamon session:
bash : 1 cinnamon-session-save –logout –silent
Then hibernate:
bash : 1 systemctl hibernate
On resume, Cinnamon should restore your session — but it’s manual, fragile, and not worth the hassle for most users.
Recommendation:
If you’re using NVIDIA + modeset=0 (which is still necessary for DP/4K or suspend stability on many setups), stick with Suspend (sleep-to-RAM).
It’s faster, more reliable, and doesn’t require session hacks.
Hibernate on Linux — especially with proprietary GPU drivers — is still a half-baked experience in 2025. The article should have mentioned this. Thanks for speaking up — you described the real-world pain point perfectly.