

Want to try out the latest GNOME Desktop 49 that’s still in development? Here how to do the job in Arch Linux.
GNOME 49 desktop environment is scheduled to be released few months later on September 17. It will be default in Ubuntu 25.10, Fedora 43, and optional in Arch & some other Linux Distributions.
GNOME 49 now is in Beta testing stage. It introduced new core apps Showtime video player, Papers document viewer, as well as blueprint-compiler and manuals for developers.
It as well disabled Xorg session (removed “Gnome on Xorg”, but can load other X11 sessions) by default, introduced new Glycin loader as backend for image decoding and saving.
Other changes so far include:
- Per-monitor brightness control.
- Move “Do Not Distrub” into top-right Quick Settings menu.
- Add option to disable
Superkey to trigger overview. - Add settings page for TrackPoint.
- initial eps bearer settings (LTE) in Access Point Name (APN) dialog.
- Support for relative dials on tablet pads
- New
Ctrl + .shortcut to open current folder in Gnome Console. - New
gnome-extensions uploadcommand. - Apply touchpad acceleration profile on startup.
- Support for YUV422 and YUV444.
- And more, see release note for details.
Install GNOME 49 RC in Arch
Arch has an official GNOME Unstable repository that contains the development releases (alpha, beta & rc) as well as stable version of the desktop environment.
According to this page, the repository has already built GNOME 49 Beta for testing purpose.
Step 1: Enable GNOME Unstable repository
As a testing repository, it’s not enabled by default.
First, launch a terminal emulator, and run command to edit the pacman package manager’s configuration file by using nano command line text editor:
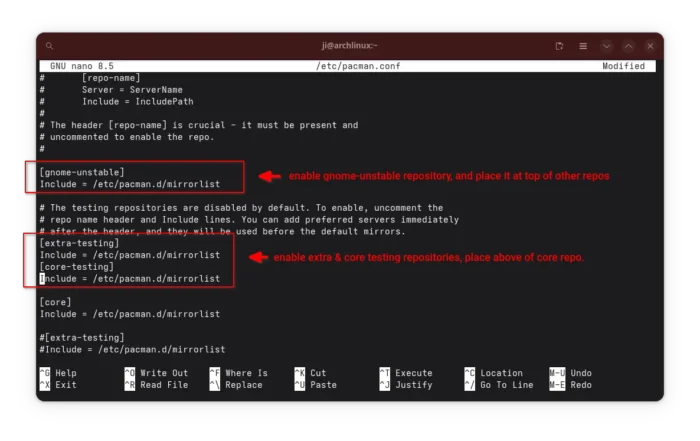
sudo nano /etc/pacman.conf
When file opens in terminal, scroll down, then add or enable (remove # at beginnings) following lines:
[gnome-unstable]
Include = /etc/pacman.d/mirrorlist

[extra-testing]
Include = /etc/pacman.d/mirrorlist
[core-testing]
Include = /etc/pacman.d/mirrorlist
This will enable Gnome-Unstable, as well as the required extra-testing and core-testing repositories.
NOTE: Gnome Unstable must be at top of all other repositories. And, extra-testing and core-testing need to be above the default core repository.
After edited the file, press Ctrl+S to save, and Ctrl+X to exit.
Step 2: Update & Install GNOME 49
After enabled the repository, run the command below to refresh package cache and install all available updates:
sudo pacman -Syu

Tips: the command might fail due to various reasons. You may run the command below instead to show debug info:
sudo pacman -Syu --debug
In my case, I got “error 43 at _alpm_gpgme_checksig (../lib/libalpm/signing.c: 593) : missing PGP signature” issue that can be skipped (it’s design issue), and failed retrieving file issue can be fixed by changing download mirror.
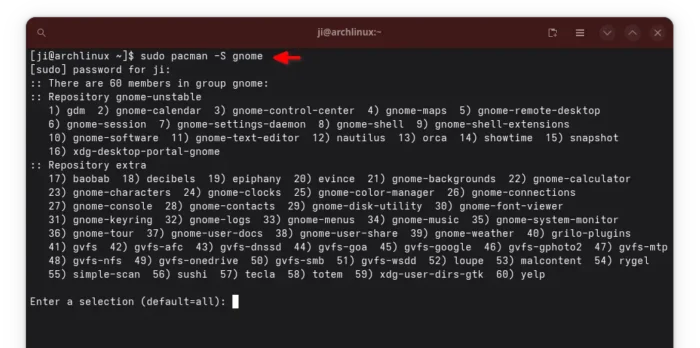
Finally, install GNOME 49 by running command:
sudo pacman -S gnome
Tips: you may combine the 2 commands above via sudo pacman -Syu gnome command.
Step 3: Switch display manager (optional)
If you’re currently working on non-GNOME desktop (e.g., XFCE, MATE, KDE Plasma), then you may optionally change the login screen to GDM.
First, run command to tell current display manager:
systemctl status display-manager.service
They are mostly lightdm (light display manager) or sddm (simple desktop display manager).
Then, disable the current display manager (lightdm for example):
sudo systemctl disable lightdm.service
And, enable GDM (Gnome Display Manager) to handle login screen:
sudo systemctl enable gdm.service
Finally, restart computer to apply changes.