


Want to enable ‘Open as Administrator’ (aka ‘Open as Root’) in your file browser context menu? Here’s the beginner’s guide shows you how with a quick fix for Ubuntu 22.04, and Ubuntu 23.04 via default Gnome Text Editor.
The tutorial will work on:
This tutorial will work on all current Ubuntu releases, including Ubuntu 18.04, Ubuntu 20.04, Ubuntu 22.04 and Ubuntu 23.04. And it’s for the default Nautilus file browser.
1.) Install nautilus-admin extension:
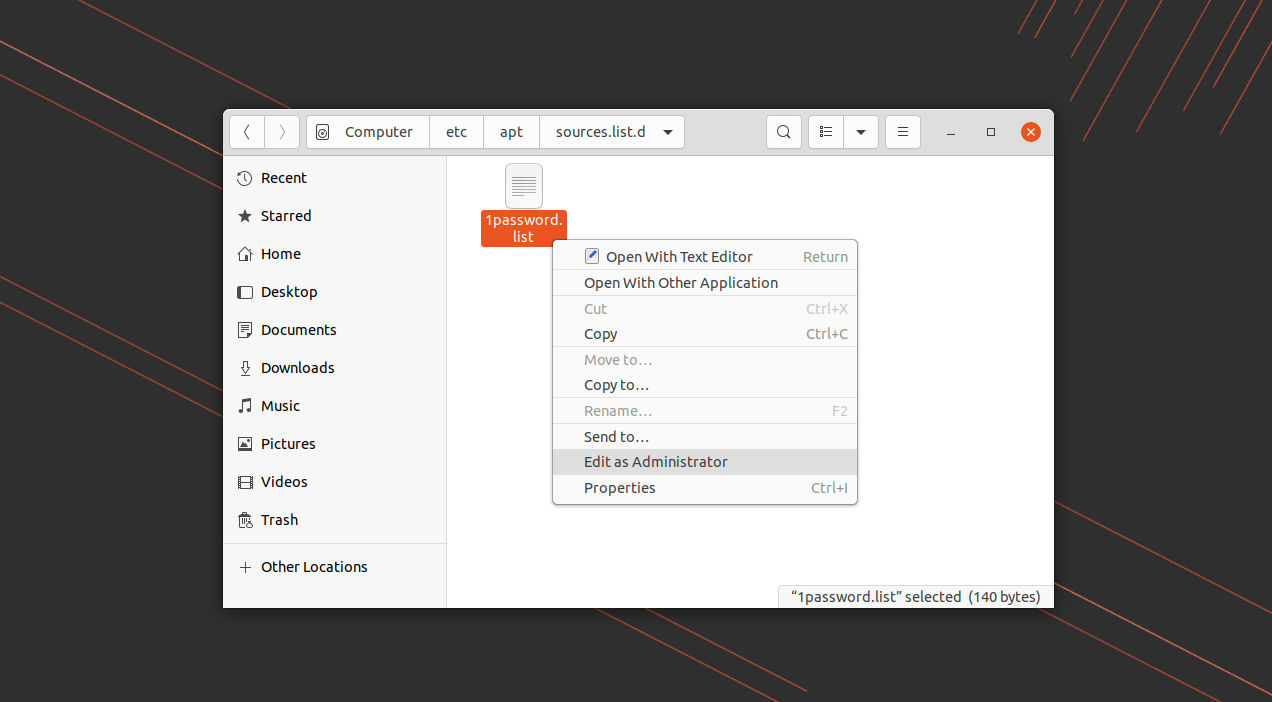
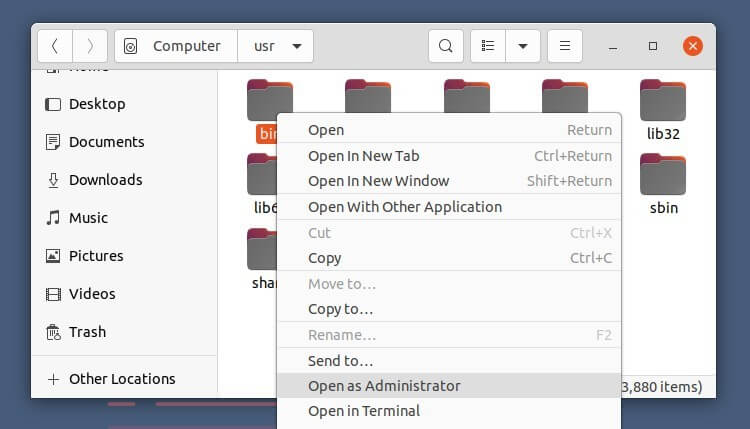
Ubuntu comes with the nautilus-admin package in the main repositories. With it, you’ll get “Edit as Administrator” option for editing documents, and “Open as Administrator” option for opening folders as root.

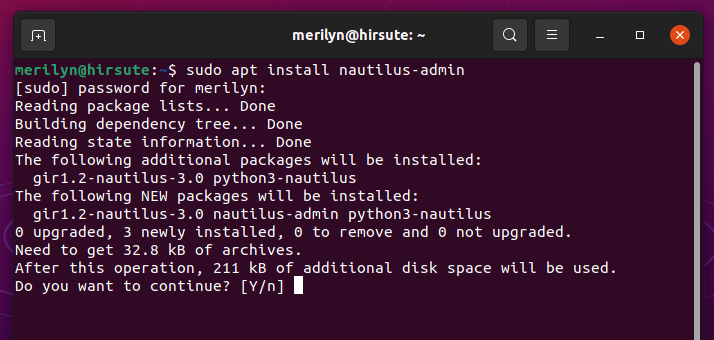
To install it, press Ctrl+Alt+T on keyboard to open terminal and run command:
sudo apt install nautilus-admin
UPDATE: For Ubuntu 22.10 & 23.04, use sudo apt install --no-install-recommends nautilus-admin command instead to skip installing Gedit text editor, since it now uses GNOME Text editor as default.

Tip: For Ubuntu MATE or Linux Mint MATE desktop, there's also a similar package called caja-admin for the Caja file browser.
2.) Restart nautilus to apply change:
After installed the extension, you need to apply change by restarting nautilus via command:
nautilus -q
Or you can just log out and back in. And it should work afterwards.
3.) Use GNOME Text Editor to edit documents as root in Ubuntu 23.04
For Ubuntu 22.04|20.04, you’re done now!
However, Ubuntu 22.10 & 23.04 has replaced Gedit with GNOME Text Editor as default! In case you don’t want to use Gedit to edit documents as administrator. Do following steps one by one:
- First, press Ctrl+Alt+T shortcut key on keyboard to open terminal.
- Then, run command to edit the extension script file:
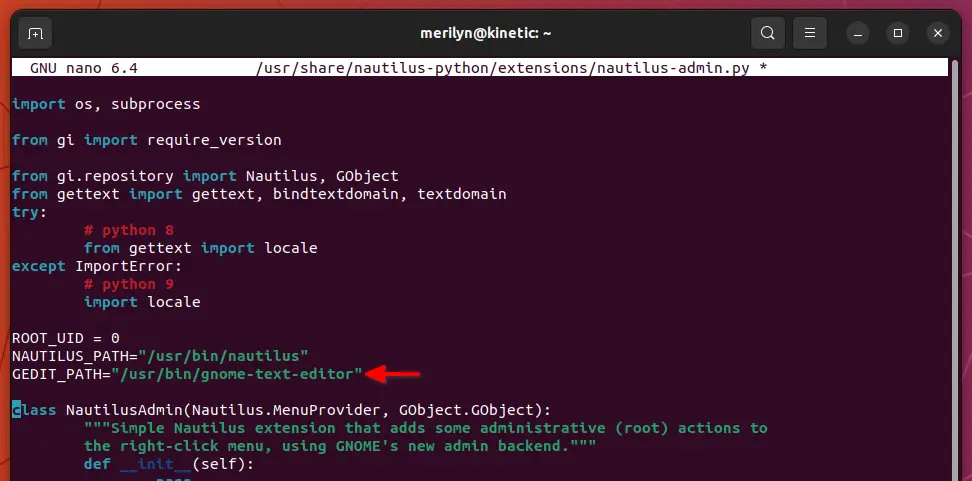
sudo nano /usr/share/nautilus-python/extensions/nautilus-admin.py
- When file opens in command, find out and replace /usr/bin/gedit with /usr/bin/gnome-text-editor as value for “GEDIT_PATH”.
- Finally, press Ctrl+X, type y and hit Enter to save file. And, run
nautilus -qcommand to apply change.
(For OLD Ubuntu) Fix / Workaround for Ubuntu 21.04 & Ubuntu 21.10:
In Ubuntu 21.04 Hirsute Hippo, there are two issues in my case. If you get into the same problem, here’s the workaround.
a.) Fix nautilus -q error for Ubuntu 21.04
Running nautilus -q command will output an error message in Ubuntu 21.04:
Traceback (most recent call last):
File “/usr/share/nautilus-python/extensions/nautilus-admin.py”, line 25, in
from gettext import gettext, locale, bindtextdomain, textdomain
ImportError: cannot import name ‘locale’ from ‘gettext’ (/usr/lib/python3.9/gettext.py)
This is due to a small change in the Python 3.9 library. To fix it, do the steps below one by one:
- Firstly press Ctrl+Alt+T on keyboard to open terminal. When it open, run command to edit the extension script:
sudo gedit /usr/share/nautilus-python/extensions/nautilus-admin.py
- When file opens, find out this line:
import os, subprocessand change it into:import os, subprocess, locale - Next find out the line:
from gettext import gettext, locale, bindtextdomain, textdomainand removelocalefrom import.
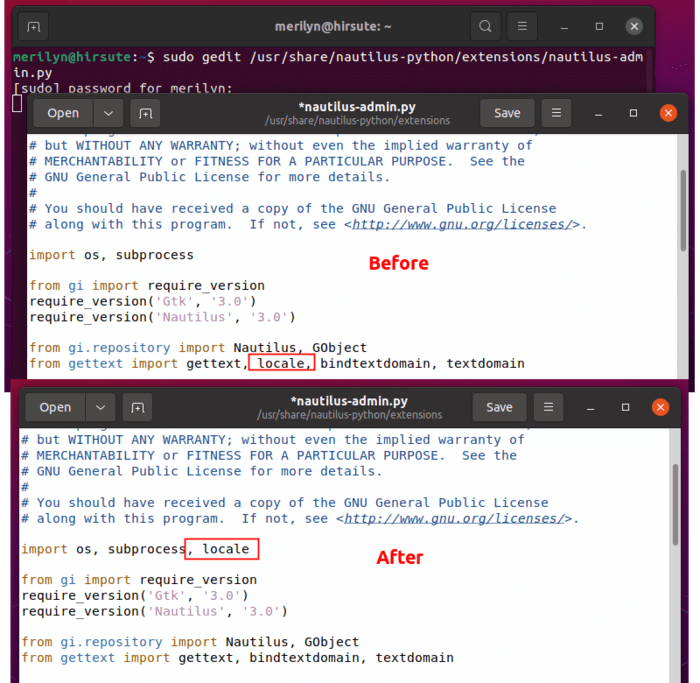

Finally save the file and restart Nautilus via nautilus -q command.
b.) Workaround for nautilus admin & gedit admin error:
Due to update of the gvfs package, you’ll get an error when using ‘Open as Admin’ action:
GDBus.Error:org.freedesktop.PolicyKit1.Error.Failed: Unix process subject does not have uid set
It’s a bug caused by the commit to fix a network permission issue for flatpak apps. The upstream has fixed the issue by releasing gvfs 1.48.1. However, Ubuntu stuck at version 1.47.91 without a fix.
Solution:
- Install gvfs 1.48.1 from a third-party PPA.
- Or downgrade gvfs by installing the package from Ubuntu 20.10.
Option 1: Install gvfs 1.48.1 from Ubuntu PPA:
Thanks to Panda Jim, who has backported the package from Debian into this Ubuntu PPA with Ubuntu 21.04 and Ubuntu 21.10 support.
Open terminal via Ctrl+Alt+T keyboard shortcut, then run the commands below one by one to add the PPA & upgrade gvfs package:
sudo add-apt-repository ppa:ubuntuhandbook1/gvfs
sudo apt update
sudo apt install gvfs
After that, the ‘Open as Administrator’ function should work at next login.
For any issue, purge the PPA which will also revert the package to the stock version:
sudo apt install ppa-purge && sudo ppa-purge ppa:ubuntuhandbook1/gvfs
Option 2: install the gvfs packages from Ubuntu 20.10:
For those don’t like third-party PPAs though upgrading gvfs is preferred, you can alternatively downgrade the gvfs package to the old 1.46 version.
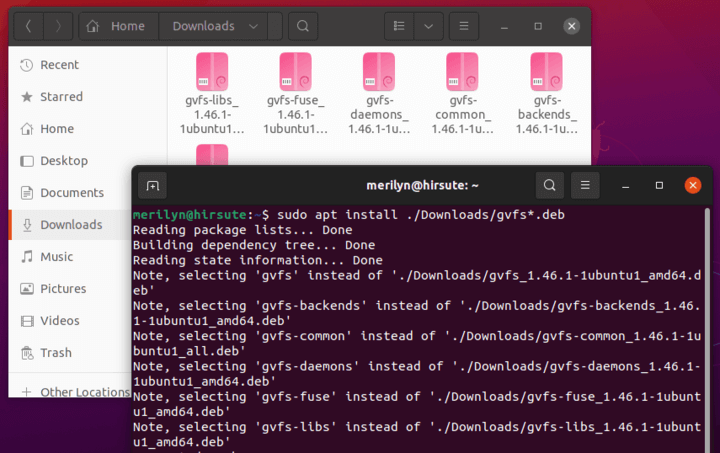
- Firstly, download the .deb packages (for 64-bit system) one by one by clicking the following links:
- Secondly, press Ctrl+Alt+T to open terminal and run command to install all downloaded deb packages:
sudo apt install ./Downloads/gvfs*.deb
Finally restart your machine to apply changes.

That’s it. Enjoy!