


This is a step by step beginner’s guide shows how to install the Rocky Linux GNOME Workstation, KDE or XFCE from an USB stick.
Rocky Linux is an open-source community-supported, production-grade enterprise operating system. It’s designed to be 100% bug-for-bug compatible with Red Hat Enterprise Linux.
Since CentOS discontinued in 2021, and CentOS Stream takes place as a newer midstream development variant. So, Rocky Linux is present to achieve the original goals of CentOS.
Requirements
To follow this tutorial, you have to prepare for something, include:
- A Linux, Windows, or MacOS PC/Laptop for creating live USB installer.
- USB stick with 4 GB+ storage.
- Internet connection to download ISO image.
Download Rocky Linux
As the normal disk images are either too large or need http downloading during the process, I used the alternative desktop images available to download at the link below:
Here you may choose the modern GNOME workstation which is default in Ubuntu and Fedora, KDE desktop that has a Windows look like layout, or lightweight XFCE for old machines. And, choose x86_64 for modern PC/laptop, aarch64 for ARM devices.
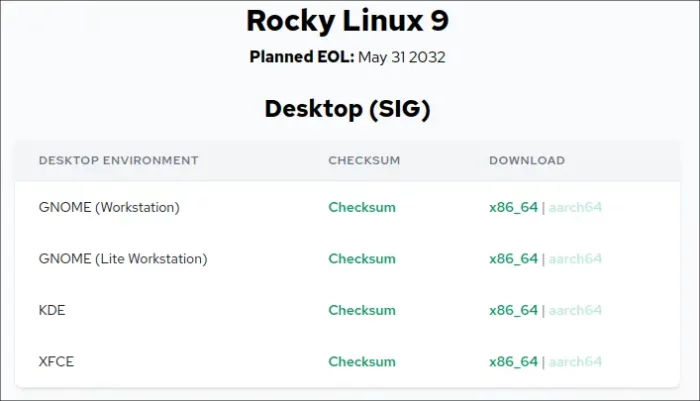

In case the official download link is too low, here are a list of download mirrors available:
Click http, https (or rsync if you have an old image) for your desired mirror, then navigate to 9 -> live -> x86_64 (or aarch64) for the iso images.
Create bootable USB installer for Rocky Linux
There are quite a few tools to burn ISO image into USB, as a boot-able installer. Personally, I prefer Ventoy. Just install the tool into USB stick, then drag and drop moving the iso into the disk, and done. See the official guide for more details.
Ventoy so far does not support Mac OS, user may follow the “option 2” via this tutorial instead.
Boot USB & Install Rocky Linux
Now plug-in the USB stick into your computer, select boot USB via BIOS/UEFI settings. You should see the following boot menu screen:
Try to disable Secure Boot in BIOS settings in case it refuse boot the USB. And re-enable it after successfully installed Rocky Linux in your machine.
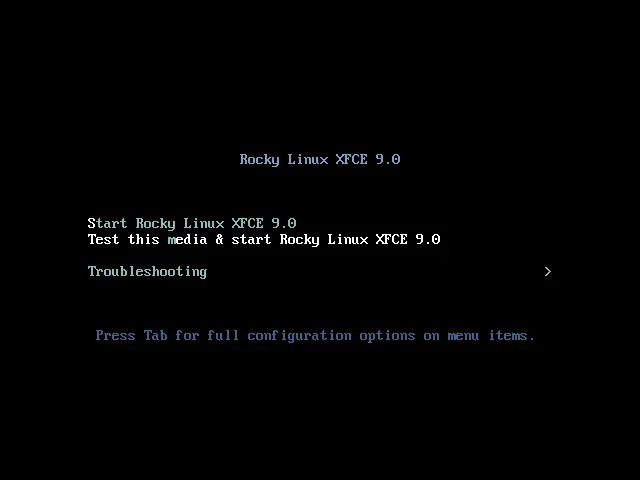
Boot one of the first 2 entries or just let it boot automatically.
Start the Installer Wizard
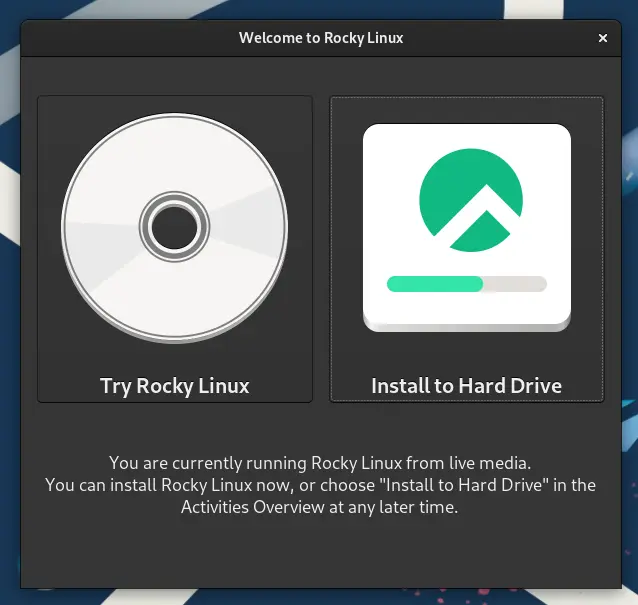
Once booted into the live system, it should pop-up the dialog allowing to choose either “Try Rocky Linux” or “Install to Hard Drive“.
You may choose the former one to try out the live system. Then, use either desktop shortcut or bottom dock icon in overview screen (click top-left “Activities” to show it) to start the wizard.

Setup location, keyboard, account
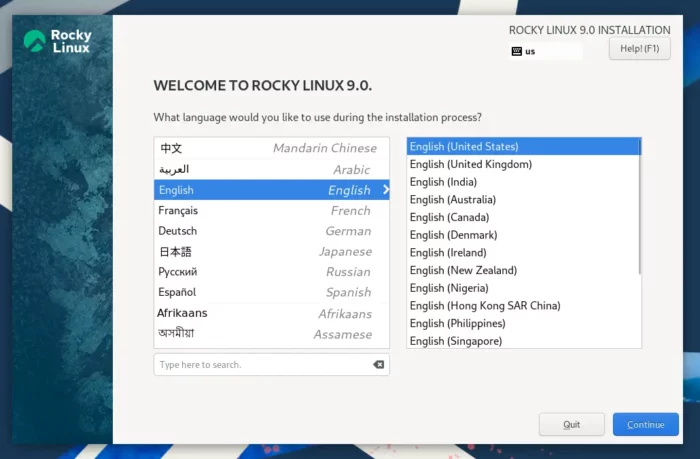
After clicking on “Install to Hard Drive” either via pop-up dialog, desktop shortcut or bottom dock shortcut icon, the wizard starts.
The first screen asks you to choose language for the installation wizard.

After clicking continue, it goes to the summary page. The default settings for keyboard, time & date are usually OK, though you can click to change them.
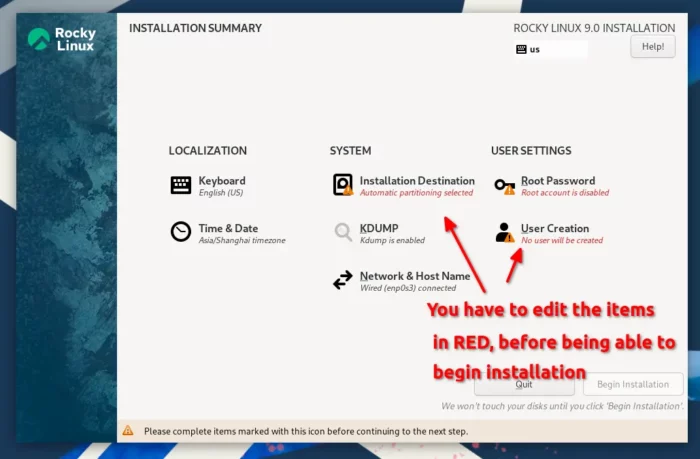
You have to edit those with small italic text in red:
- Root Password – It’s OK to ignore it. Create an admin account will get rid of the alert. However, you may enable it for rescue purpose.
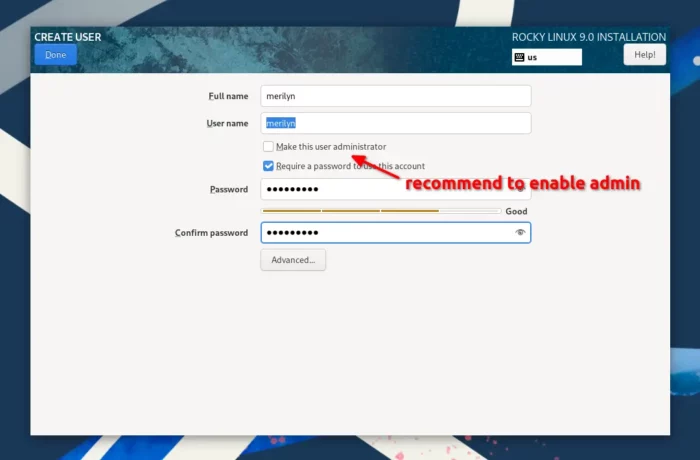
- User Creation (required) – Set first account and password. Recommend to enable “Make this user administrator“. You may ignore the ‘Advanced’ settings, since they also can be done after installation. And click “Done” button to go back summary page.
- Installation Destination – assign disk space for the system (see next step).

Setup Disk Partition (e.g., for Dual-boot)
In the summary page, click “Installation Destination” will go to the disk selection page.
Then choose or select your hard disk under ‘Lock Standard Disks’. There should be a little check-mark says whether selected or not.
Ignore “Specialized & Network Disks” as I’m going to install the system on local disk. Then, choose either automatic or custom mode.
Automatic mode
The automatic mode assigns all the free disk space automatically (if any) for Rocky Linux, without touching existing data in hard disk.
It is great if there’s ENOUGH free space (20 GB at least, as large as possible for long time use). It will automatically dual- or multi-boot MS Windows or other Linux exist in your disk.
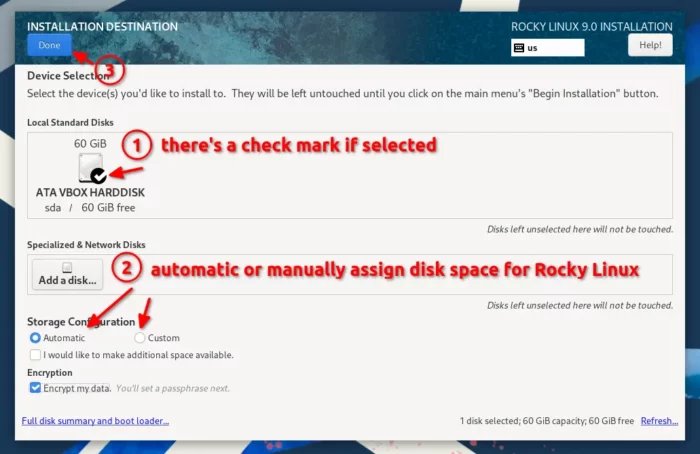

For choice, you may enable “Encrypt my data“, so every boot or even mount from another system (or machine) will ask password before being able to access the data.
Custom mode
In case there’s no enough free space, or you want to set a certain size for Rocky Linux, select “Custom” in previous screen and click “Done”.
It will open the partition page, which shows existing disk partitions in the left. In my case, it displayed my Ubuntu 22.04 partitions (swap and root), and Windows partitions as Unknown NTFS (Sadly I can’t take screenshot as it was in real machine).


In case there’s no enough free space (check the bottom left info with red background), choose un-used partitions and click “–” to free up disk spaces.
Change will apply when you click "Done" and confirm in next pop-up. Do it carefully!
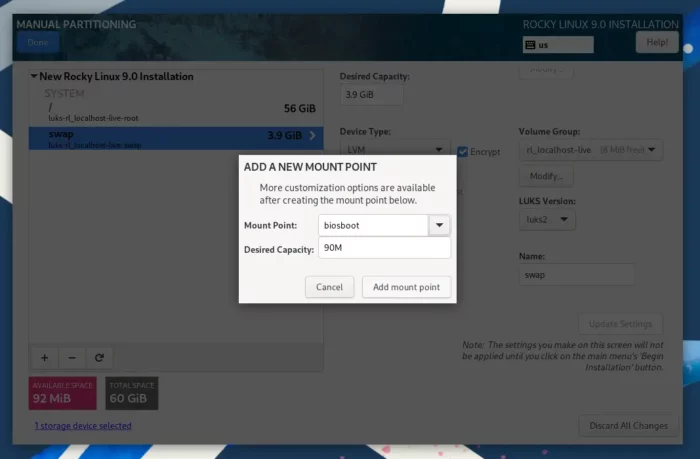
Creat /boot/efi or bios-boot partition
In the custom mode, you usually need to create following partitions for Rocky Linux: /boot/efi or bios-boot, swap (optional), root, /boot (optional).
Once you get enough free space, click on “+” to create a new partition. And set:
- Mount Point: biosboot or /boot/efi – Only one option available depends on Secure Boot status
- Desired Capacity: 2MB for biosboot, 100MB ~ 500MB for /boot/efi
Finally, click “Add mount point“. It will display the new created partition in the list, with options to edit it.
NOTE: this partition MUST be standard partition while NOT encrypted!
Creat root partition
Now click on the “+” again, and set for the main system partition:
- Mount Point: /
- Desired Capacity: 20G at least, as large as possible for long time use.
After clicking “Add mount point” button, you may enable “Encrypt” option. It will ask for setting a password when all partitions done.

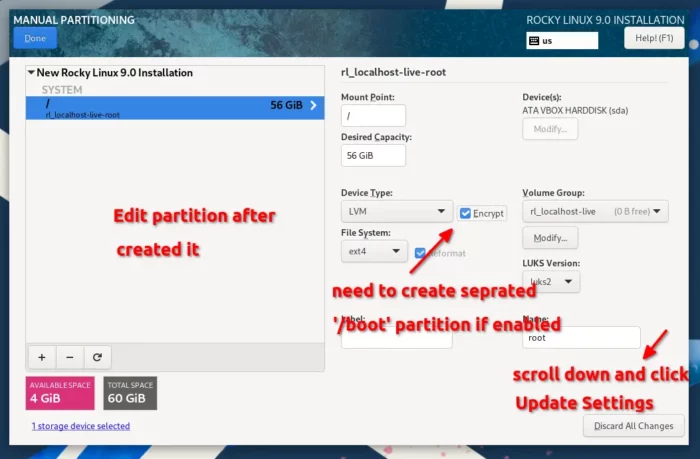
NOTE:If you’re NOT going to create separate /boot partition, then the root (/) partition MUST be standard partition rather than LVM.
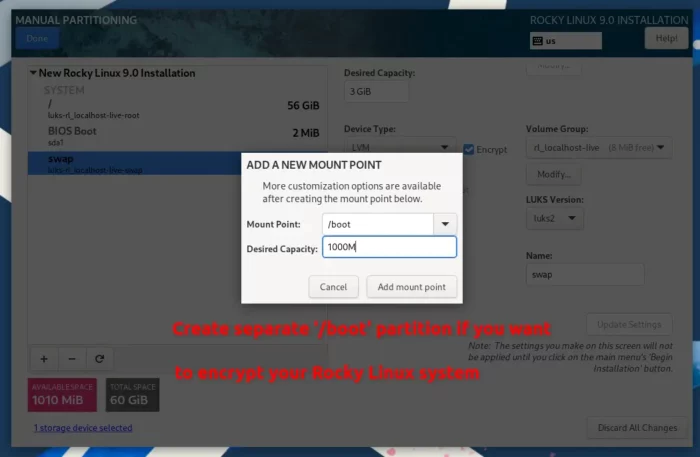
Creat /boot partition
The /boot partition is optional, however, required if you enabled “Encrypt” option for root.
Just click on “+” button to create a new partition, and set:
- Mount Point: /boot
- Desired Capacity: 1000M
NOTE: /boot partition MUST be standard partition and NOT encrypted!

Creat Swap partition
Swap is useful when you have a small RAM memory or need hibernate function. But, it’s optional in case you have a large RAM.
Also, click on “+” button to create partition, and set:
- Mount Point: swap
- Desired Capacity: as large as RAM
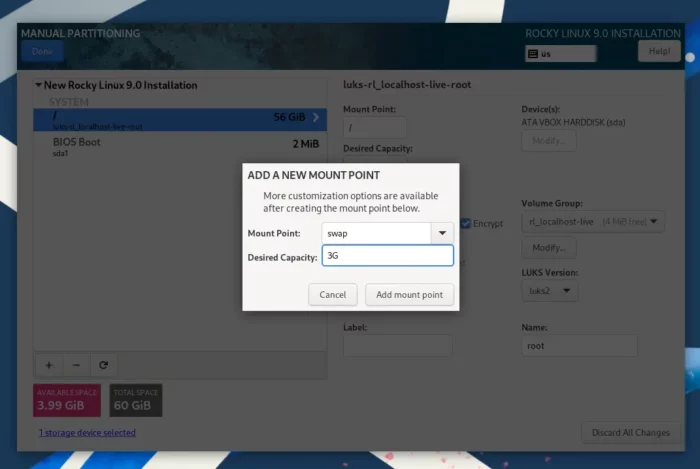

If you have encrypted the root partition, then also encrypt Swap to make the system more secure.
Confirm and set encryption password
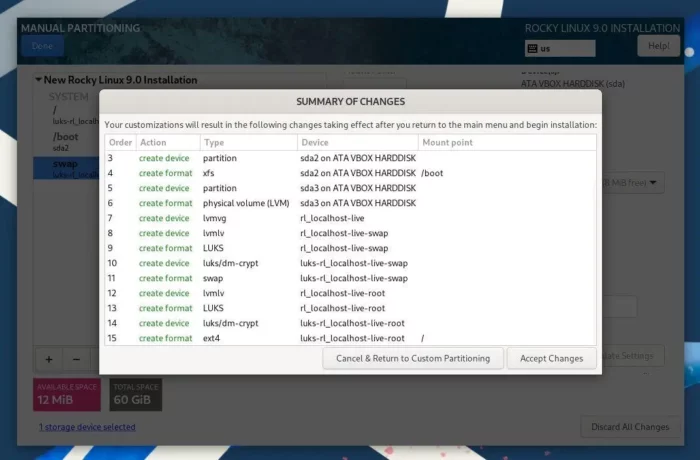
After creating all the disk partitions, click “Done” button. A bottom bar will prompt for errors if any! Or, it pop-up the dialog to set encryption password if enabled.

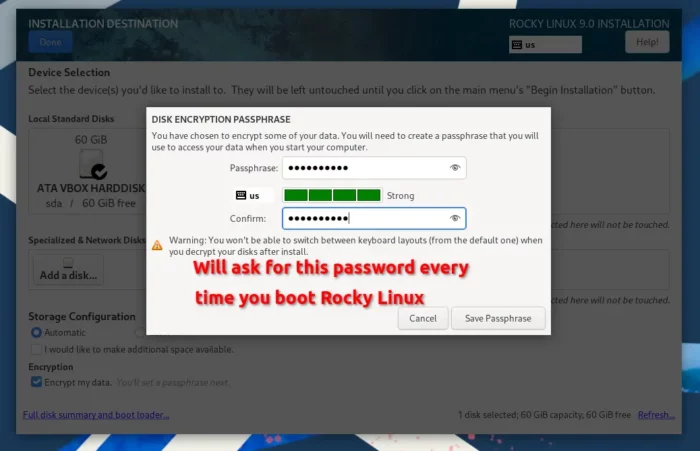
After that, it shows the summary what it will do on your disk. Once you click “Accept Changes”, the installer wizard goes back to the summary page.
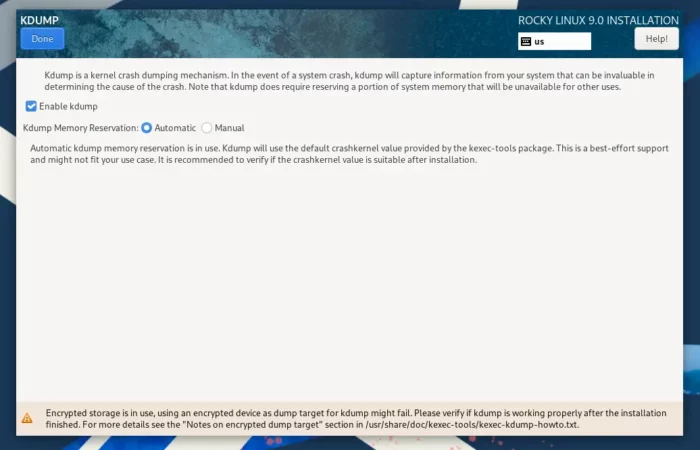
Before being able to click “Begin Installation”, you have also to click editing “KDUMP” (if encryption enabled). The automatic mode is OK, though you may manually set memory size to be reserved for kernel crash dumping.

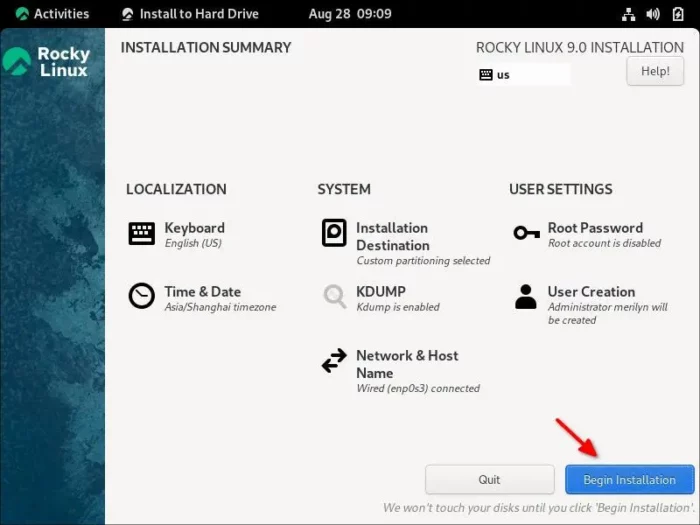
NOTE: Until this step, you can still UNDO all the changes to your disk!
If everything’s done correctly, the “Begin Installation” button should be clickable in the summary page. Click on it to start installing Rocky Linux!

Finally, just wait until the installing process done. If no error occurs, it should prompt that Rocky Linux is successfully installed and ready for you to use, along with a “Finish Installation” button.
Just close the wizard, then either continue testing the live OS or restart your machine.