


We install many app packages from third-party software sources in Debian & Ubuntu Linux. However, when adding repository keys it may indicate that “apt-key is deprecated“. Here’s how to fix the warning and use the correct way to install OpenGPG keys.
Why apt-key is deprecated?
We used to use apt-key add command to add a new key into /etc/apt/trusted.gpg.d/ directory. It makes system to accept signatures from the third-party key-holder on all other repositories in the system. Which means any third-party repository whose key is in there can replace any package in whole system.
It’s a big security risk. Debian decides to use “signed-by” option instead for each third-party repository. So, it will accept the signature for only that signed repository. And, apt-key will be working though with warnings last in Debian 11 / Ubuntu 22.04.
How to Correctly Add GPG Key:
Step 1: Download & De-armor GPG key
According to Debian policy, it’s recommended to dearmor the GPG key. So, the key file content will be un-readable garbled text!
1. First, download the key file (file with .asc, .key, .gpg extension) either via browser link, or wget/curl command.
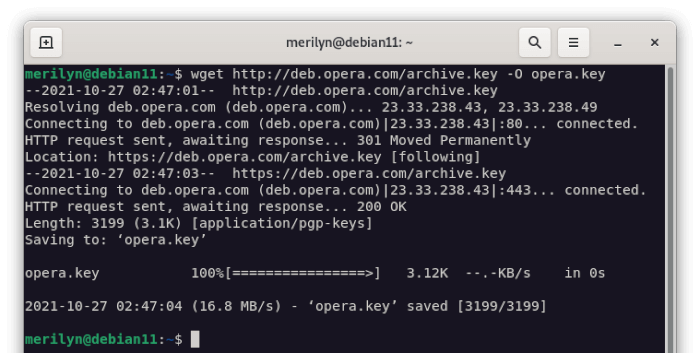
For example, download the key file for Opera web browser:
wget http://deb.opera.com/archive.key -O opera.key
It’s OK now to go “Step 3” to copy/move the key file to correct place. For better security, it’s recommended to de-armor the key first.
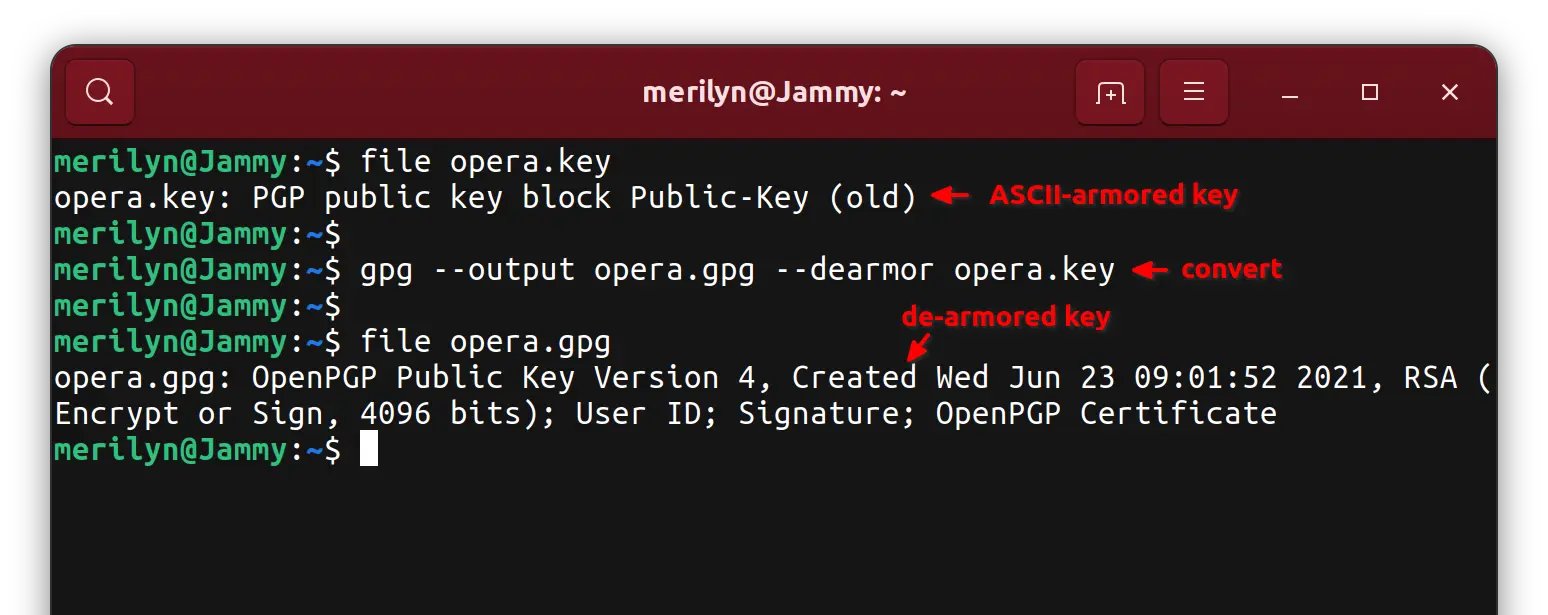
2. Verify the key file by running command:
file opera.key
For the ASCII-armored key, it outputs “PGP public key block Public-Key (old)“. And the file context, starts with “—-BEGIN PGP PUBLIC KEY BLOCK—-“, ends with “—–END PGP PUBLIC KEY BLOCK—–“.
For de-armored key, it outputs something like “OpenPGP Public Key Version 4, Created Wed Jun 23 09:01:52 2021, RSA (Encrypt or Sign, 4096 bits); User ID; Signature; OpenPGP Certificate“.
Step 2. Convert ASCII-armored key to recommend GPG:
For the armored key, it’s better to run command in terminal to de-armor it:
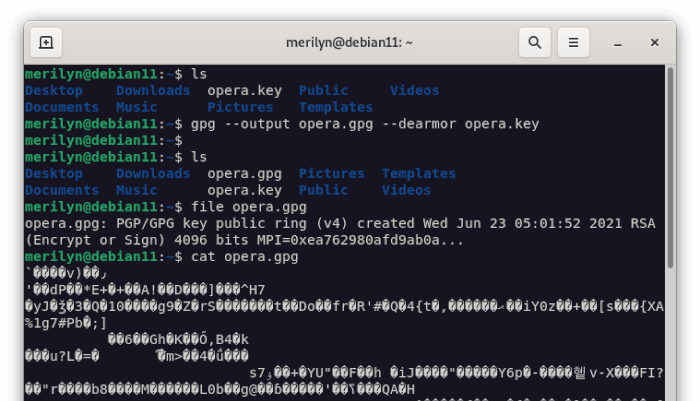
gpg --output opera.gpg --dearmor opera.key
It will generate the new “opera.gpg” key file. And, verify it again via “file opera.gpg” command will output something look like:
PGP/GPG key public ring (v4) created Wed Jun 23 17:01:52 2021 RSA (Encrypt or Sign) 4096 bits MPI=0xea762980afd9ab0a…
And open the new key, you’ll see un-readable garbled text.
Step 3. Put the key file to the right place:
You can finally put the key file into one of the following directories:
- “
/usr/share/keyrings“ - “
/usr/local/share/keyrings“ - “
/etc/apt/keyrings” (more preferred)
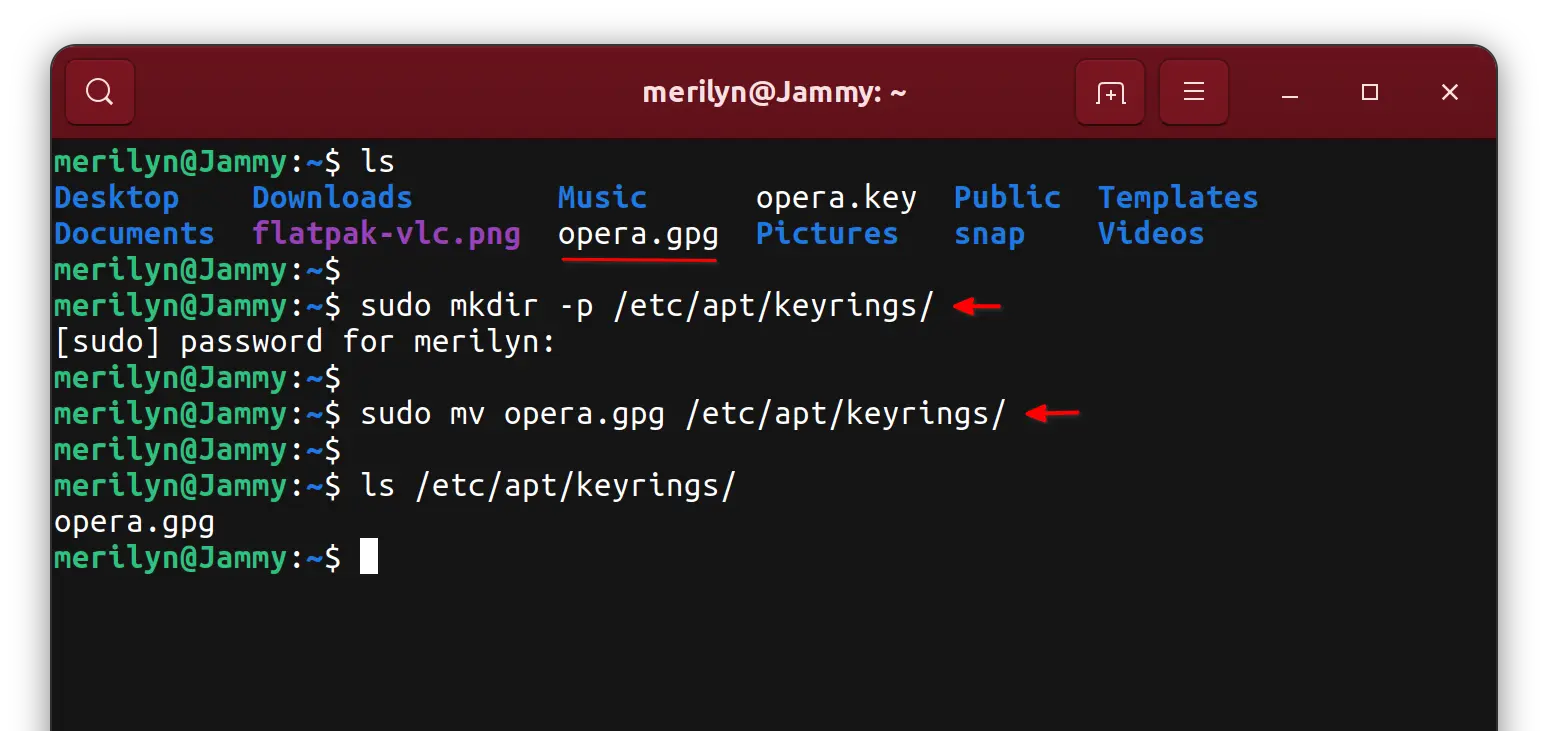
Here I’m going to create the directory (in case it’s not exist), and move the key into there via command:
sudo mkdir -p /etc/apt/keyrings
sudo mv opera.gpg /etc/apt/keyrings
Single command to install the key file
To be simple, you may run the single command instead of the preview steps to download, de-armor, then install (move) an ASCII-armored key:
wget -O - <https://example.com/key/repo-key.asc/gpg/key> | gpg --dearmor | sudo tee /etc/apt/keyrings/<repo-key>.gpg
or use curl command:
curl <https://example.com/key/repo-key.asc/gpg/key> | gpg --dearmor | sudo dd of=/etc/apt/keyrings/<repo-key>.gpg
In my case, the command will be (create /etc/apt/sources if not exist):
wget -O - http://deb.opera.com/archive.key | gpg --dearmor | sudo tee /etc/apt/keyrings/opera.gpg
Create Source File for third-party repository:
After adding the key correctly, run command to create and edit the source file (replace opera to yours):
sudo nano /etc/apt/sources.list.d/opera.sources
Then write something like below into the file:
Types: deb
URIs: https://deb.opera.com/opera-stable/
Suites: stable
Components: non-free
Architectures: amd64
Signed-By: /etc/apt/keyrings/opera.gpg
Finally press Ctrl+X, type y and hit Enter to save the file.
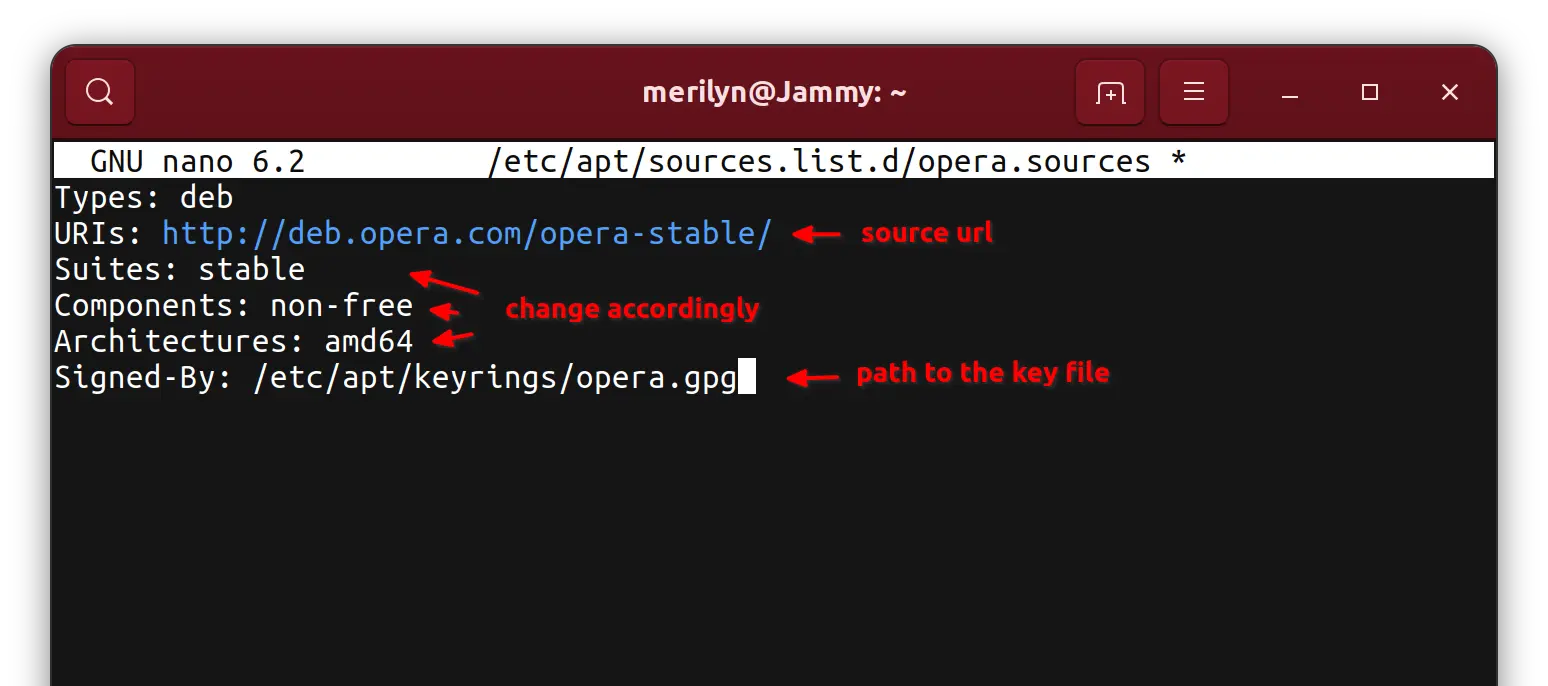
In the source file, you have to replace the value of “URIs” (source url) and “Signed-By” (path to key file) to yours! “Architectures” is optional, though you can add more (Architectures: amd64 i386) depends on the package types that the repository provides.
Get the value for “Suites” and “Components”
The value of “Suites” is usually your system code-name, stable, unstable, etc. Here’s how I find them:
- First, the source URIs is usually visitable. Copy and paste it into your web browser’s address bar and hit Enter.
- When the page opens, check the “dists” link page, which contains possible values for “Suites”.
- And, check “pool” link for value of “Components”
As the screenshot shows, I can use “jessie”, “sid”, “squeeze”, etc, as value of “Suites”. They are code-names for Debian, in my case in Ubuntu I choose “stable”. For “Components” in the case, use ‘non-free’ as its value.
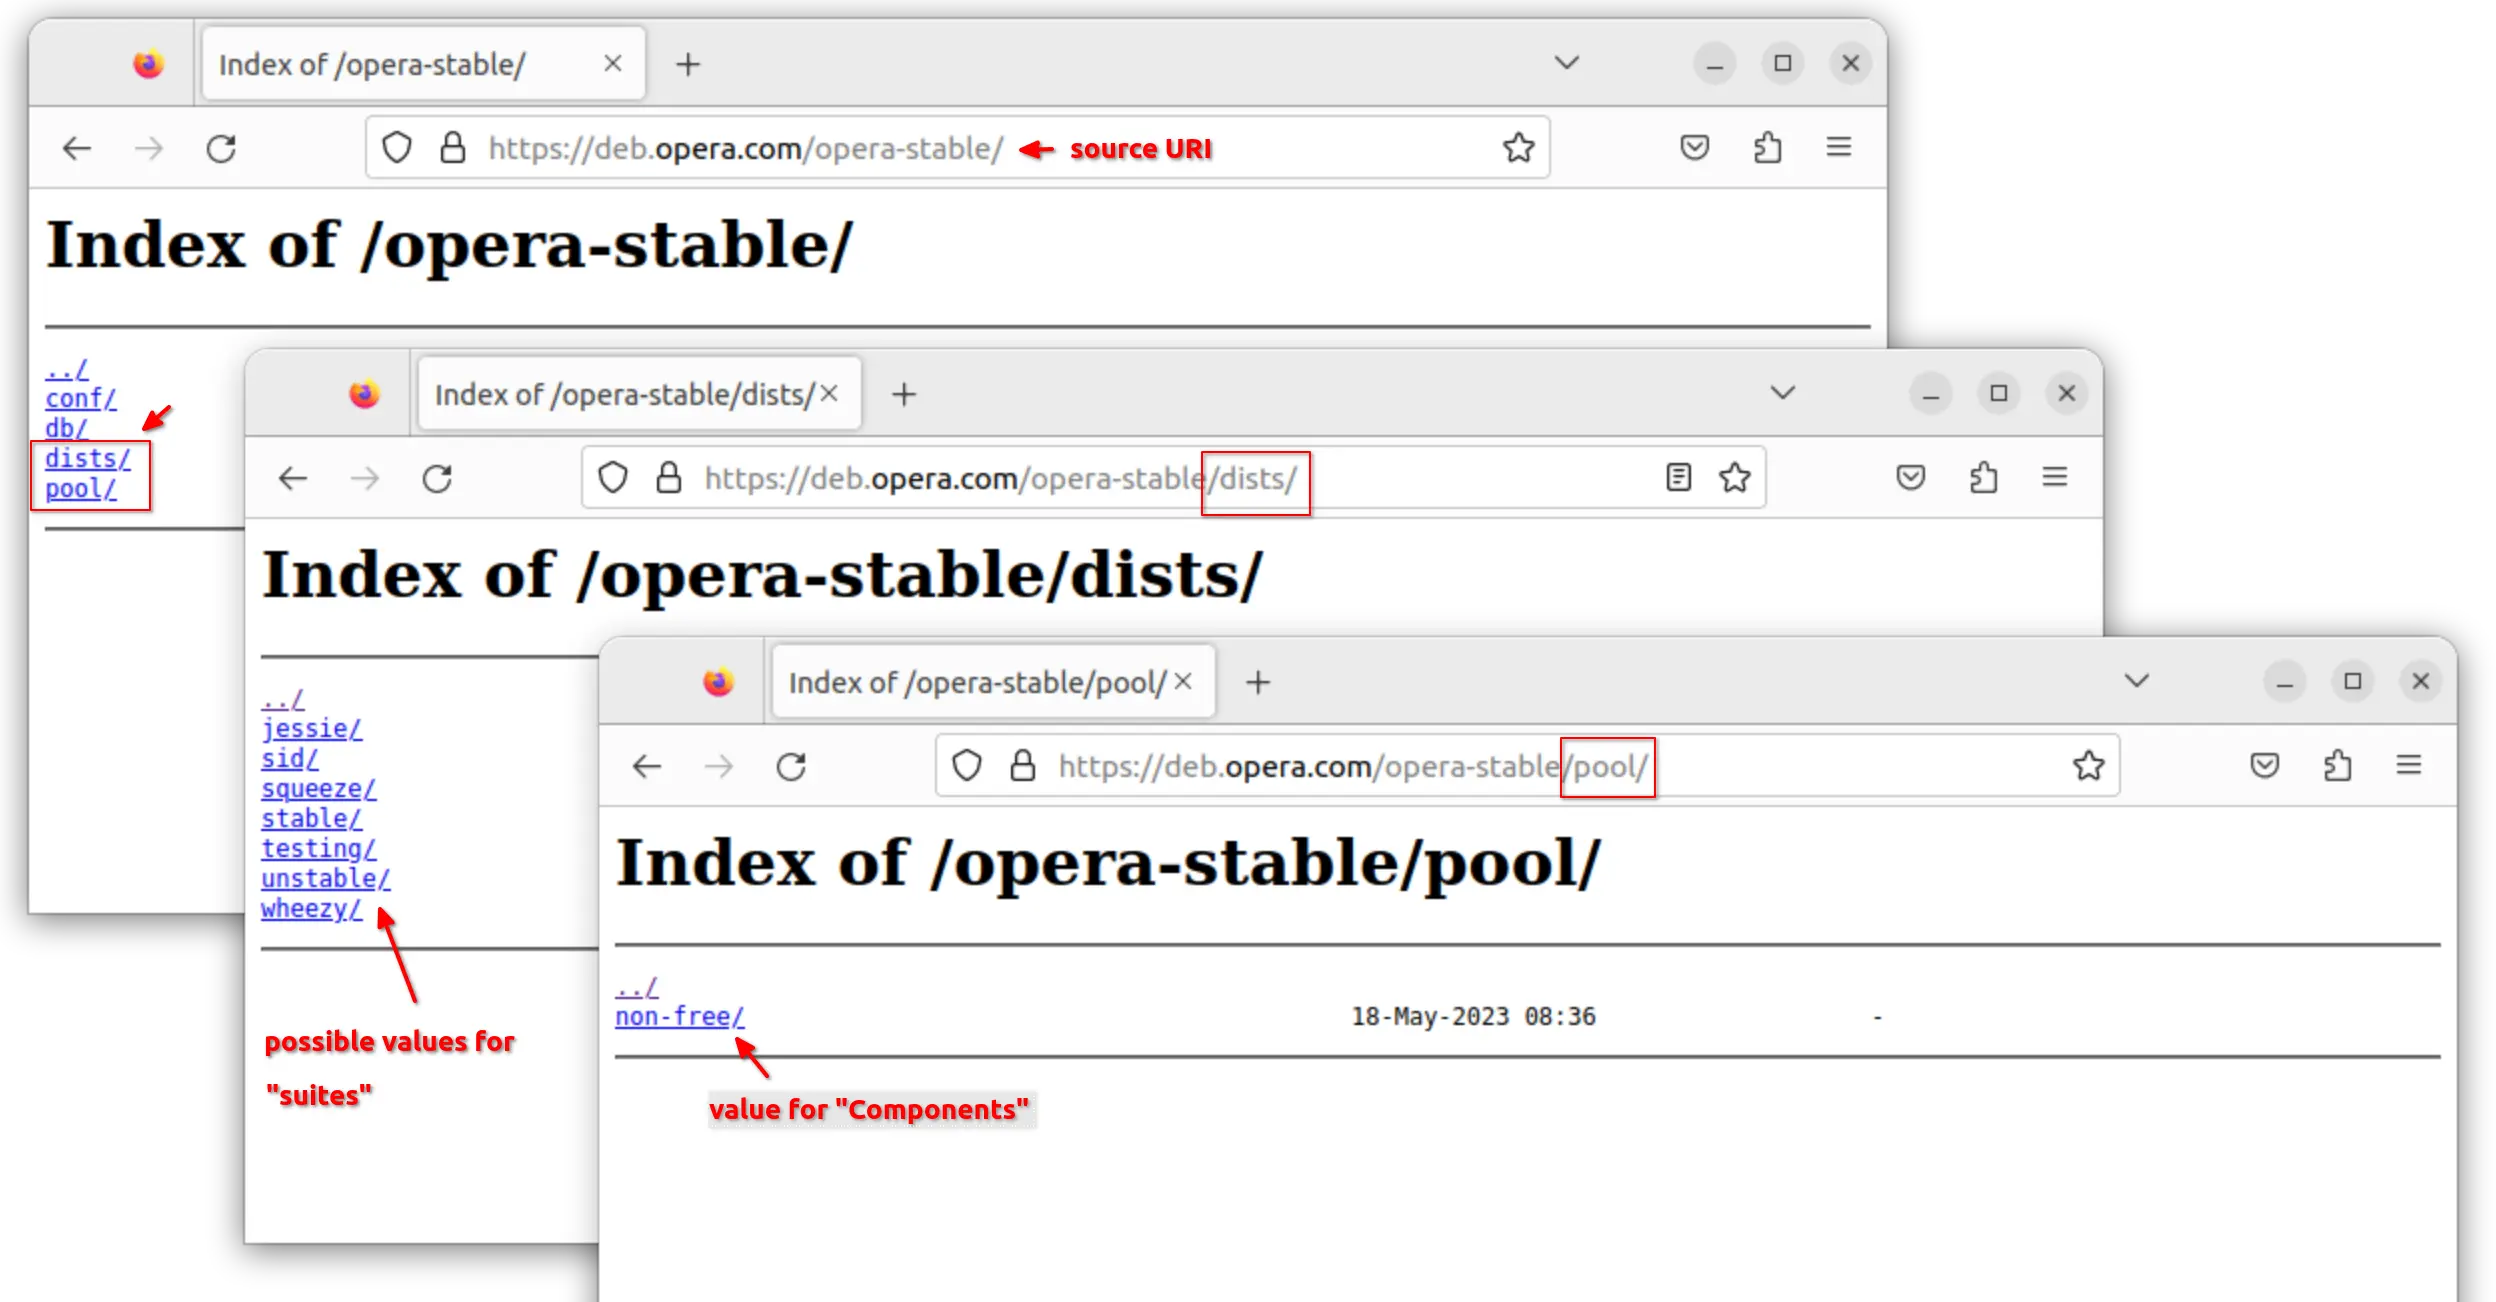
NOTE: run command lsb_release -c can tell your system code-name. For Linux Mint, etc, use cat /etc/os-release to tell which Ubuntu version is based on.
Set Package Priority (Optional):
To prevent from upgrading already installed packages from official repositories, user may set a lower package priority for the third-party repositories.
Firstly, run command to create and config the preferences file:
sudo nano /etc/apt/preferences.d/opera.pref
When it opens, paste the line below:
Package: *
Pin: origin deb.opera.com
Pin-Priority: 100
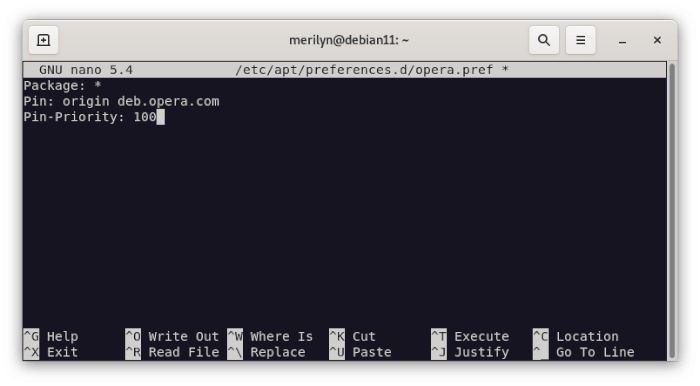
Set “Pin-Priority” to 100 allows to perform upgrade of packages only installed from that repository. You may set it 1, to allow to install packages from the repository but forbid automated upgrades.
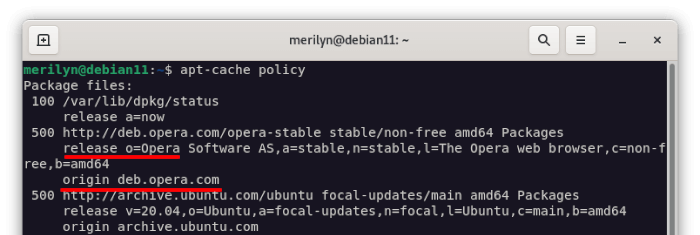
And for the “Pin” value, run command below to tell:
sudo apt update && apt-cache policy
That’s all. Enjoy!